After taking a look at the current state of Android development and how to set up your development 2022-6-30 13:25:0 Author: code.tutsplus.com(查看原文) 阅读量:19 收藏
After taking a look at the current state of Android development and how to set up your development environment, in this lesson, you are going to learn how to build and launch your first Android application.
I won't focus too much on the details, because those are covered extensively later in this series. The aim of this article is to provide a broad overview of what it takes to make an Android app.
Do you find it easier to learn with video? Why not check out our course:
1. Setting Up the Project
An Android project is nothing more than a collection of files and folders. There are several ways to set up an Android project. In the past, developers had to manually create each project. Fortunately, Android Studio has a convenient wizard whose purpose is creating the folder structure and the files necessary to start a project.
When you launch Android Studio, you are presented with the following welcome screen:


On the left, you see a list of recent projects. On the right, you can create a new project by checking it out from version control or by creating a brand new one. Choose the first option, Start a new Android Studio project.


Android Studio asks you some basic information about your application, the name, where you want to store the project files, and the package name. While the first two are self-explanatory, the package name might confuse you.
The package name defines your application's identity and serves as a unique identifier in a variety of situations, such as on Google Play. For this reason, it must be unique. Each app has a unique package name.
Because the number of Android apps is growing every day, it is common practice to use reverse domain name notation for the package name of an app. For example, the package name of an application published by Envato Tuts+ could start with com.tutsplus. Keep in mind that there is no connection between the package name and the owner of the actual domain name.
In Android Studio, enter Hello World as the app name, code.tutsplus.com as Company Domain, and choose a location to store the project on your machine. The app name and company name are used to generate the package name, com.tutsplus.code.helloworld. Click Next to continue.
On the following screen, you are asked to set the minimum Android SDK version you plan to support.


The Android SDK is in continuous development and every year a new version is released with all sorts of improvements and new features. Some tools and libraries that you can use in later Android versions are not present in older ones. Google's support libraries bring some of the new features to older versions of the Android operating system, such as material design elements. The support libraries can only do so much, though.
Generally speaking, you should never go below Gingerbread, which is API level 9. That said, if your goal is to reach a broad audience, then you may want to support at least every version of Ice Cream Sandwich, which is API level 14.
In this project, we won't be using APIs that were introduced in recent SDK versions. Set the API level to 9 and click Next to continue.
On the next screen, Android Studio asks us whether it needs to create an activity for us to start with.


Activities are a fundamental building block of Android applications and we will cover them later in this series. In a sense, an activity is to an Android app what a web page is to a website. Technically, this is not the most accurate comparison, but it should give you an idea of the role activities play in an Android application.
Activities are Java classes that extend the Activity class, a class defined by the Android SDK. The developer overrides some of its methods to add custom behavior. There is usually a layout associated with each activity, which is an XML file that defines the user interface of the activity. This is similar to the HTML of a web page.
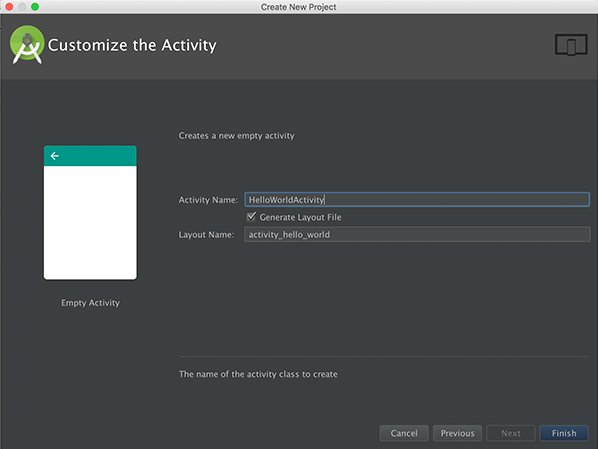
Android Studio's wizard offers us to generate the app's first activity. Choose Empty Activity and click Next.
On the following screen, set the name of the activity to HelloWorldActivity and click Finish to complete the setup process.


2. Welcome to Android Studio
Based on the settings we provided, Android Studio creates the files and folders for the project. You should now see the user interface of Android Studio with the new project opened.


At first, the user interface may be a bit overwhelming. If you want to develop for Android, however, there are a few things you need to know. Where is the code of your project? Where are your project's files? And how can you build and run your app?
Android Studio is based on IntelliJ, an IDE (Integrated Development Environment) developed by JetBrains. It is very powerful and helps you manage your development workflow via shortcuts, method generation, automated code refactoring, direct links to the various parts of your project, Javadoc popups, and so on. Google designed Android Studio for Android development, with support for XML (with a convenient WYSIWYG editor) and Groovy (for Gradle scripts).
On the left, you should see a tree of directories. That is the heart of your project where you can find the files and assets of your project. The folders you'll spend most of your time in are java and res. In java, you find your project's Java classes. In res, you can find the rest of your project's resources, such as layouts, values sheets, images, and so on.
At the top, you can see a list of buttons that give you access to the most important features of Android Studio, such as building, running, and syncing the project, updating the SDK, and modifying emulators.


For this lesson, you just need to know about one, the play button on the far left. This button builds and runs your application.
3. Writing Code
You should feel more comfortable with the Android Studio user interface and it is time to get your hands dirty and write some code.
Step 1: Layout
The first thing you have to do is define the layout of your main activity. Go to the project panel on the left and double-click activity_hello_world.xml, which you can find in the java/layout folder. Android Studio created this layout file for us, together with the HelloWorldActivity.java file.
Alternatively, you can press Command + Shift + O (Control + Shift + N on Windows), type the first few letters of the name of the file, and hit Enter when Android Studio suggests the right file. Command + O / Control + N runs a search limited to the Java classes whereas Command + Shift + O / Control + Shift + N searches the entire project.


What you see is a standard layout generated by Android Studio, presented in the WYSIWYG editor.


Instead of using the WYSIWYG editor, we are going to modify the XML of the layout. This gives us more control. You can do this by clicking the Text tab in the bottom left of the editor, next to the Design tab. Add an id to the TextView element and a Button just below it. Don't worry too much about the code we are adding. This will become clear later in this series.
<TextView
    android:id="@+id/text"
    android:layout_centerInParent="true"
    android:layout_width="wrap_content"
    android:layout_height="wrap_content"
    android:text="" />

<Button
    android:layout_width="wrap_content"
    android:layout_height="wrap_content"
    android:layout_centerHorizontal="true"
    android:text="Click here to say hi"
    android:onClick="sayHi"/>
The id is used to reference a user interface element in code. Android Studio generates in real-time a class, R.java, in which the identifiers of the layout are referenced. The other interesting field in this layout is the Button's onClick. When the user clicks the button, the operating system calls the activity's sayHi() method.


Step 2: Activity
Next, open HelloWorldActivity.java. As you can see, the basic skeleton of the activity is already there. The class already extends AppCompatActivity, which extends Activity.java. HelloWorldActivity implements the onCreate() method. Add a reference to the TextView, using findViewById(), and define the public method called by the button's onClick event.
private TextView mText;

@Override
protected void onCreate(Bundle savedInstanceState) {
    super.onCreate(savedInstanceState);
    setContentView(R.layout.activity_hello_world);

    // Get View reference
    mText = (TextView) findViewById(R.id.text);

}

public void sayHi(View view) {
    mText.setText("Hello World!");
}
As you can see, findViewById() returns a View object. This means that you need to cast it to a TextView if you want to change the label's text by calling setText(). In fact, all the elements that you can use when designing your user interface extend the View class, another fundamental component of the Android SDK.
4. Running Your First Android App
You are finally ready to launch your first Android application. Let's see how to bring your app to life.
Click the green play button we talked about earlier or go to Run > Run 'app'. Android Studio asks you to select a deployment target. Select Create New Emulator and choose one of the suggested presets (for example, Nexus 5). Click Next, choose a system image (whichever you prefer, from Gingerbread upwards), and click Next again, leaving all options at their default values.


Next, select the newly created emulator and let the magic happen.


Conclusion
In this lesson, you learned how to develop a Hello World Android application. In particular, you now know enough about Android Studio to develop a working app. You also explored the basic structure of an Android project and had a brief look at some method and classes of the Android SDK (Activity and View) and the findViewById() method.
I hope I have given you a feel of what it means to develop for Android. In the next lesson, you lean how to use the built-in sample importer in Android Studio and how to find additional samples from Google.
如有侵权请联系:admin#unsafe.sh