
Bandit是一个用来检查python代码中安全问题的静态分析工具,它会处理各个各个源代码文件,解析出AST抽象语法树,然后对AST节点运行对应的插件,当Bandit扫描结束后会生成安全报告
项目地址:https://github.com/PyCQA/bandit
项目文档:https://bandit.readthedocs.io/en/latest/
安装使用
直接使用的话用pip下载即可

检测存在漏洞的flask项目
bandit -r ./

自定义漏洞检测
在bandit扫描过程中将漏洞库里的内容与被检测代码相对比,以此来检测漏洞。内置的漏洞检测插件存放在
bandit/plugins文件夹下,用户也可以构建自己的测试文件来检测自定义的漏洞,方便bandit的扩展。
现有的bandit漏洞库可以检查文件权限、硬编码密钥、硬编码临时目录、密码未设置隐私、硬编码SQL语句等类型的漏洞
可以在bandit -h查看
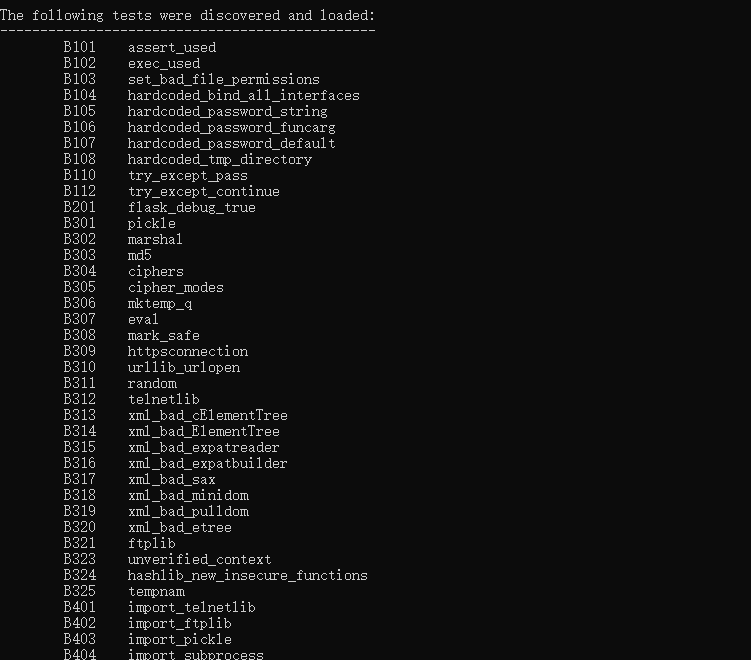
用户可以通过三种方式完成Bandit的自定义漏洞
- 编写自定义漏洞插件
以app_debug.py插件为例,该插件检测flask服务器是否在生产环境开启了debug模式
import bandit
from bandit.core import issue
from bandit.core import test_properties as test


@test.test_id("B201")
@test.checks("Call")
def flask_debug_true(context):
    if context.is_module_imported_like("flask"):
        if context.call_function_name_qual.endswith(".run"):
            if context.check_call_arg_value("debug", "True"):
                return bandit.Issue(
                    severity=bandit.HIGH,
                    confidence=bandit.MEDIUM,
                    cwe=issue.Cwe.CODE_INJECTION,
                    text="A Flask app appears to be run with debug=True, "
                    "which exposes the Werkzeug debugger and allows "
                    "the execution of arbitrary code.",
                    lineno=context.get_lineno_for_call_arg("debug"),
                )
@test.test_id("B201")是编号装饰器,每个漏洞有特定的编号,在Bandit现有的漏洞库中,编号从B101到B703结束,编号的第一位都是大写字母B,编号第二位将漏洞类型进行了分类
@test.checks("Call")是类型漏洞,这里的Call表示漏洞是由函数调用引起的,除此之外还有Str、Assert、Exec等类型
在漏洞检测插件的正文,调用了多个bandit的内置函数,我们利用这些内置函数来编写配置文件和漏洞文件
Bandit内置函数表如下

现在来看app_debug插件正文就很容易理解了,表示当前节点的上下文环境导入了flask包,同时调用该节点的限定名后缀为.run,参数名和参数值debug=True,如果这些条件都满足,则表示漏洞存在
- 设置imports.py配置文件
imports.py用于检测可能会发生危险的import语句,定义了bandit里面B401->B415的漏洞。例如可能会导致python反序列化漏洞的相关库

个人感觉这部分还可以再细分一点,就像safety-db一样检测存在漏洞的特定版本的库
- 设置calls.py配置文件
calls.py用来检测文件中可能存在漏洞的调用,定义了B301->B325的漏洞,需要检测到漏洞包的导入+漏洞包在正文代码中的调用,需要检测的内容通常由几部分组成,以.隔开,必须将每部分都进行匹配之后才可以检测出来,以B303中的hashlib.md5为例
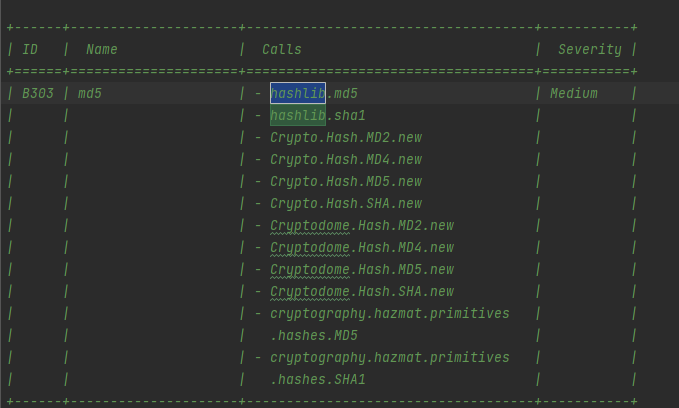
当程序中同时出现import hashlib和hashlib.md5()时,bandit能够检测出漏洞;当程序出现import hashlib和hashlib.md2()时不能检测漏洞
源码分析
git clone https://github.com/PyCQA/bandit
安装对应的库文件
pip3 install -r requirements.txt
入口文件在bandit/cli/main.py的main()
使用方法如下
usage: main.py [-h] [-r] [-a {file,vuln}] [-n CONTEXT_LINES] [-c CONFIG_FILE]
               [-p PROFILE] [-t TESTS] [-s SKIPS]
               [-l | --severity-level {all,low,medium,high}]
               [-i | --confidence-level {all,low,medium,high}]
               [-f {csv,custom,html,json,screen,txt,xml,yaml}]
               [--msg-template MSG_TEMPLATE] [-o [OUTPUT_FILE]] [-v] [-d] [-q]
               [--ignore-nosec] [-x EXCLUDED_PATHS] [-b BASELINE]
               [--ini INI_PATH] [--exit-zero] [--version]
[targets [targets ...]]跟进main方法,函数开头进行了项目初始化、获取用户传入的参数,例如我们在前面输入的-r参数在这里获取
parser.add_argument(
        "-r",
        "--recursive",
        dest="recursive",
        action="store_true",
        help="find and process files in subdirectories",
    )
表示递归查找和处理该目录下的文件
plugin_info = [
        f"{a[0]}\t{a[1].name}" for a in extension_mgr.plugins_by_id.items()
    ]
    blacklist_info = []
    for a in extension_mgr.blacklist.items():
        for b in a[1]:
            blacklist_info.append("{}\t{}".format(b["id"], b["name"]))

    plugin_list = "\n\t".join(sorted(set(plugin_info + blacklist_info)))
拼接形成目前能检测的插件列表,即这一部分
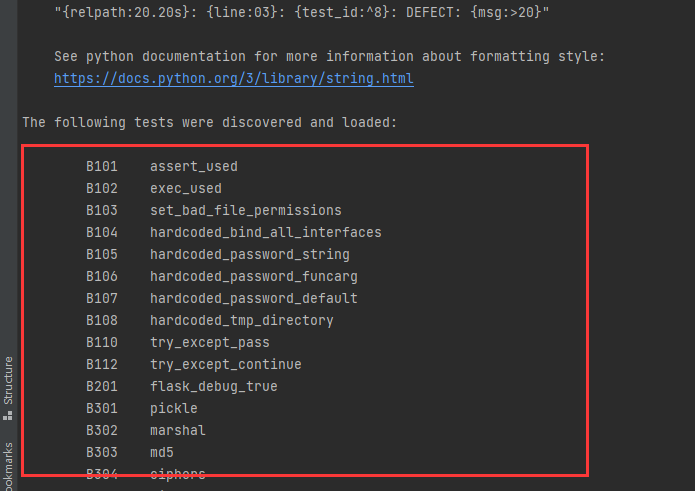
检测插件由两部分:plugin和blacklist组成
plugin即在plugins文件夹下的插件列表
blacklist由两部分组成,详情可见bandit/blacklists文件夹下的calls.py和imports.py
接下来的代码中继续初始化项目参数,创建重要对象BanditManager
b_mgr = b_manager.BanditManager(
        b_conf,
        args.agg_type,
        args.debug,
        profile=profile,
        verbose=args.verbose,
        quiet=args.quiet,
        ignore_nosec=args.ignore_nosec,
    )
来到discover_files方法
b_mgr.discover_files(args.targets, args.recursive, args.excluded_paths)
该方法传入三个参数
- targets 扫描文件或目录
- recursive 是否递归扫描
- excluded_paths 不扫描的后缀、文件、目录

跟进函数之后获取了我们需要扫描的文件
for fname in targets:
            # if this is a directory and recursive is set, find all files
            if os.path.isdir(fname):
                if recursive:
                    new_files, newly_excluded = _get_files_from_dir(
                        fname,
                        included_globs=included_globs,
                        excluded_path_strings=excluded_path_globs,
                    )
                    files_list.update(new_files)
                    excluded_files.update(newly_excluded)
files_list作为集合存储需要扫描的目标文件列表
excluded_files作为集合存储不需要扫描的文件列表
回到main.py,再进入b_mgr.run_tests(),开始检测漏洞
遍历所有需要检测的文件并进一步操作
for count, fname in enumerate(files):
            LOG.debug("working on file : %s", fname)

            try:
                if fname == "-":
                    open_fd = os.fdopen(sys.stdin.fileno(), "rb", 0)
                    fdata = io.BytesIO(open_fd.read())
                    new_files_list = [
                        "<stdin>" if x == "-" else x for x in new_files_list
                    ]
                    self._parse_file("<stdin>", fdata, new_files_list)
                else:
                    with open(fname, "rb") as fdata:
                        self._parse_file(fname, fdata, new_files_list)
            except OSError as e:
                self.skipped.append((fname, e.strerror))
                new_files_list.remove(fname)
进入self._parse_file(fname, fdata, new_files_list)核心函数
该函数传入三个参数
- fname 检测文件名
- fdata 文件内容
- new_files_list 待检测文件列表
跟进后进入score = self._execute_ast_visitor(fname, fdata, data, nosec_lines)
def _execute_ast_visitor(self, fname, fdata, data, nosec_lines):
        """Execute AST parse on each file

        :param fname: The name of the file being parsed
        :param data: Original file contents
        :param lines: The lines of code to process
        :return: The accumulated test score
        """
        score = []
        res = b_node_visitor.BanditNodeVisitor(
            fname,
            fdata,
            self.b_ma,
            self.b_ts,
            self.debug,
            nosec_lines,
            self.metrics,
        )

        score = res.process(data)
        self.results.extend(res.tester.results)
        return score
BanditNodeVisitor中定义了很多例如visit_Import、visit_ImportFrom、visit_Call、visit_FunctionDef等等函数,顾名思义就是对各个类型的AST Node执行对应的函数
process方法中f_ast = ast.parse(data)解析源文件为AST抽象语法树
在generic_visit(f_ast)方法中遍历AST节点并对其类型进行对应的检测
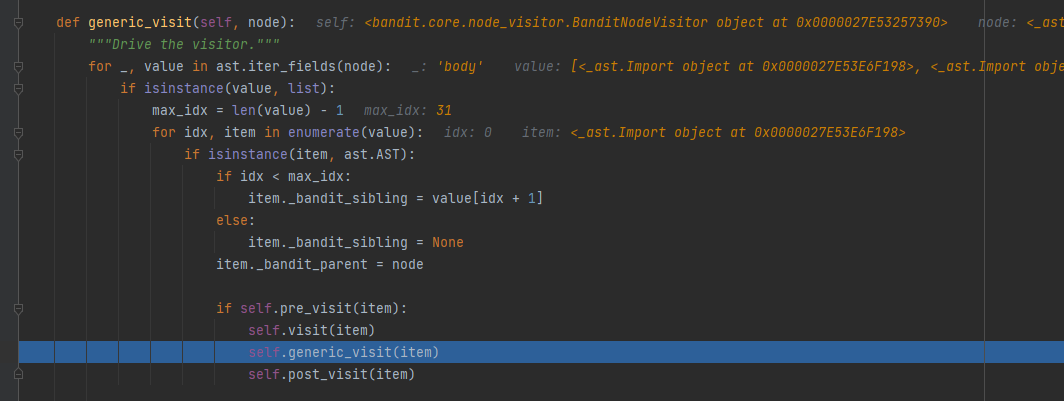
以我们前面说到的import检测为例,这里的检测函数是visit_Import
def visit_Import(self, node):
        for nodename in node.names:
            if nodename.asname:
                self.import_aliases[nodename.asname] = nodename.name
            self.imports.add(nodename.name)
            self.context["module"] = nodename.name
        self.update_scores(self.tester.run_tests(self.context, "Import"))
其实就是把import的包名,以及该节点的一些上下文环境提取出来存放在self.context中,然后用tester.run_tests执行Import节点的检查,如果查出问题就保存起来
遍历完所有需要检测的文件中的AST节点后,最后是输出结果
LOG.debug(b_mgr.b_ma)
    LOG.debug(b_mgr.metrics)

    # trigger output of results by Bandit Manager
    sev_level = constants.RANKING[args.severity - 1]
    conf_level = constants.RANKING[args.confidence - 1]
    b_mgr.output_results(
        args.context_lines,
        sev_level,
        conf_level,
        args.output_file,
        args.output_format,
        args.msg_template,
    )
检测实战
既然要检测当然考虑到批量的情况,这里给出批量检测github上开源项目代码的相关操作流程
例如我们想要搜索python编写的cms,会出现下面这些结果,访问链接为:

我们使用官方API进行请求,根据规则编写API访问链接:https://api.github.com/search/repositories?q=cms+language:python&per_page=10&page=1&sort=updated
- page: 第几页,从1开始(如果小于1,则默认为第1页)
- per_page : 每页多少个项
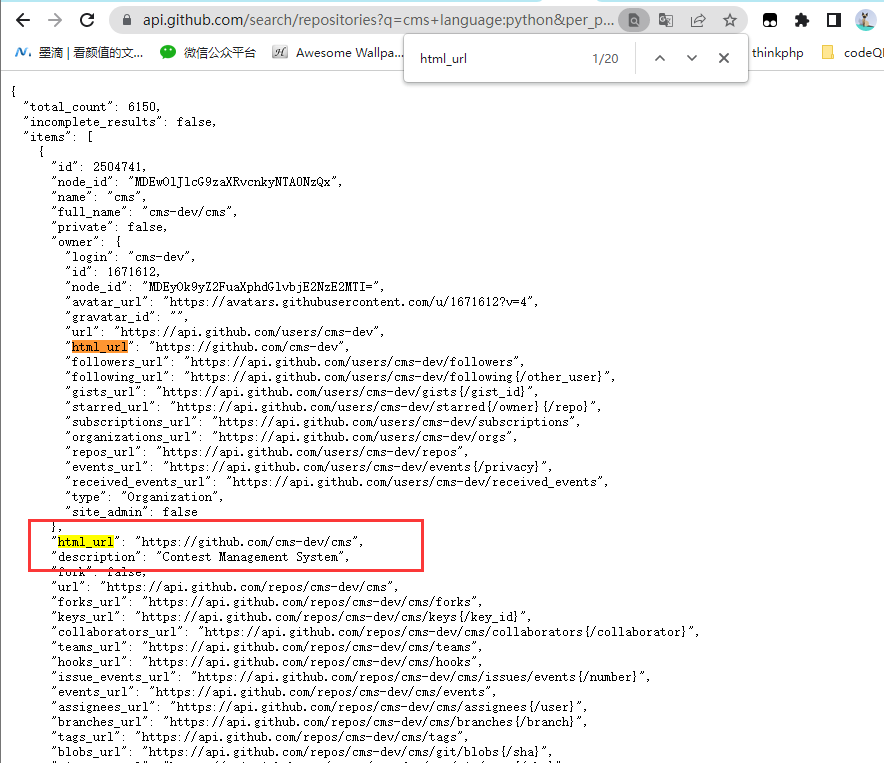
我们获取到仓库地址之后下载到本地进行扫描
Github API还有访问速率的限制 Github Rate Limit Docs
对于使用基本身份验证、OAuth 或客户端 ID 和密码的请求,我们每分钟最多可以提出 30 个请求。 对于未经身份验证的请求,速率限制允许您每分钟最多提出 10 个请求,考虑到本地对仓库代码进行解析和漏洞检测也需要时间,我们不进行身份验证,每分钟内完成当页内容的漏洞检测
编写一个调用Github API进行仓库下载,并使用bandit检测的脚本如下
import time

import requests
import json
import os
import datetime
import logging
MAX_NUM=2
def getRepItem(keyword,per_page=10):
    for i in range(1,MAX_NUM):
        starttime = datetime.datetime.now()
        url="https://api.github.com/search/repositories?q={}&per_page={}&page={}".format(keyword,per_page,i)
        rep=requests.get(url,timeout=5)
        items=json.loads(rep.text)['items']
        for j in range(len(items)):
            rep_url=items[j]['html_url']
            cloneRsp(rep_url)
            filename=rep_url.split('/')[4]
            callBandit(filename)
        endtime = datetime.datetime.now()
        checkTime((endtime - starttime).seconds)
    return

def cloneRsp(url):
    logging.info("clone {}".format(url))
    os.system('git clone {}'.format(url))

def callBandit(filename):
    logging.info("bandit {}".format(filename))
    os.system("bandit -r ./{} -f html -o ./{}/scan_{}.html".format(filename,filename,filename))

def checkTime(runtime):
    logging.info("runtime is {}".format(runtime))
    if runtime<60:
        time.sleep(62-int(runtime))

def main():
    getRepItem("cms+language:python")

if __name__ == '__main__':
    main()
MAX_NUM限制爬取的页数,getRepItem传入符合搜索语法的关键字
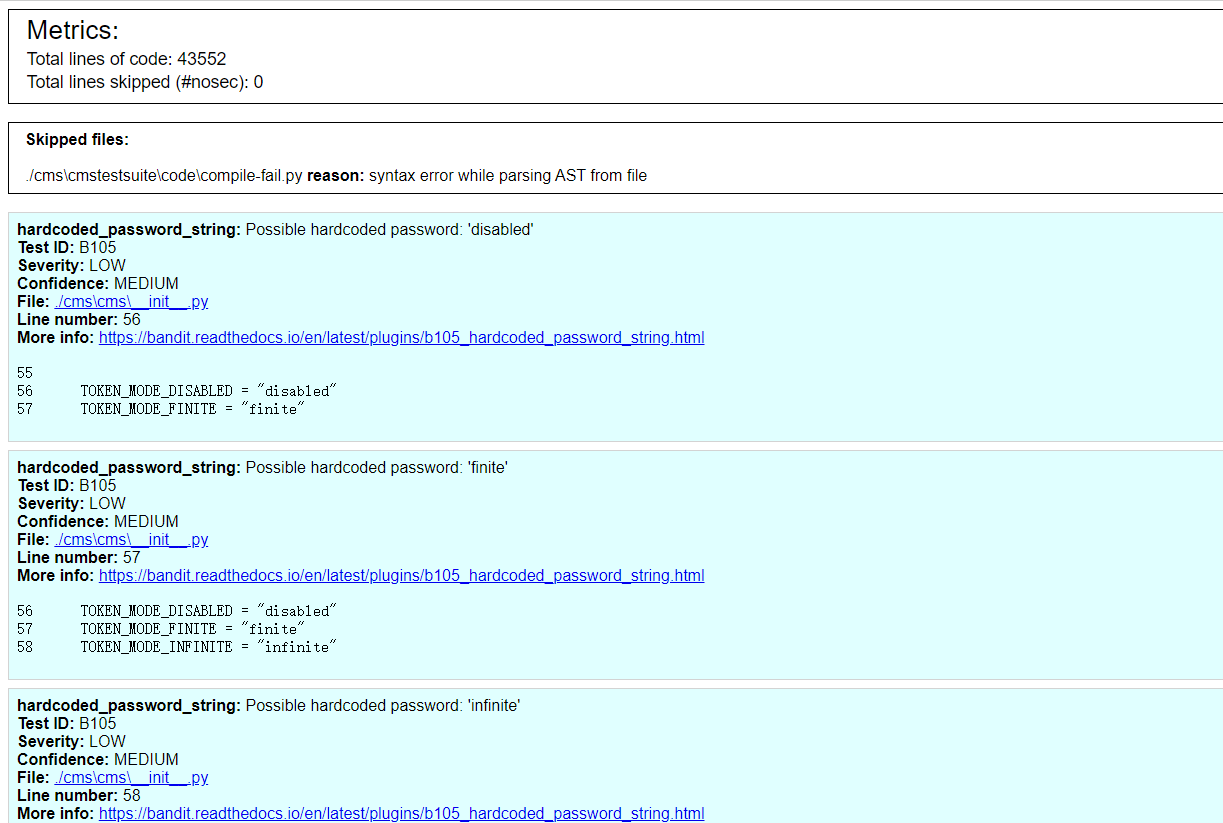
运行之后就会在clone的项目文件夹下生成scan_项目名.html的漏洞检测报告了
参考链接
如有侵权请联系:admin#unsafe.sh